Installation
1. Installing the Operating System on Raspberry Pi
1.1. Preparing the Hardware and SD Card
Take the SD card and insert it into your PC (via a card reader or adapter).
Make sure there is nothing important on the card (it will be completely formatted).
For more details on the hardware required for operation, see the Hardware Selection Guide.
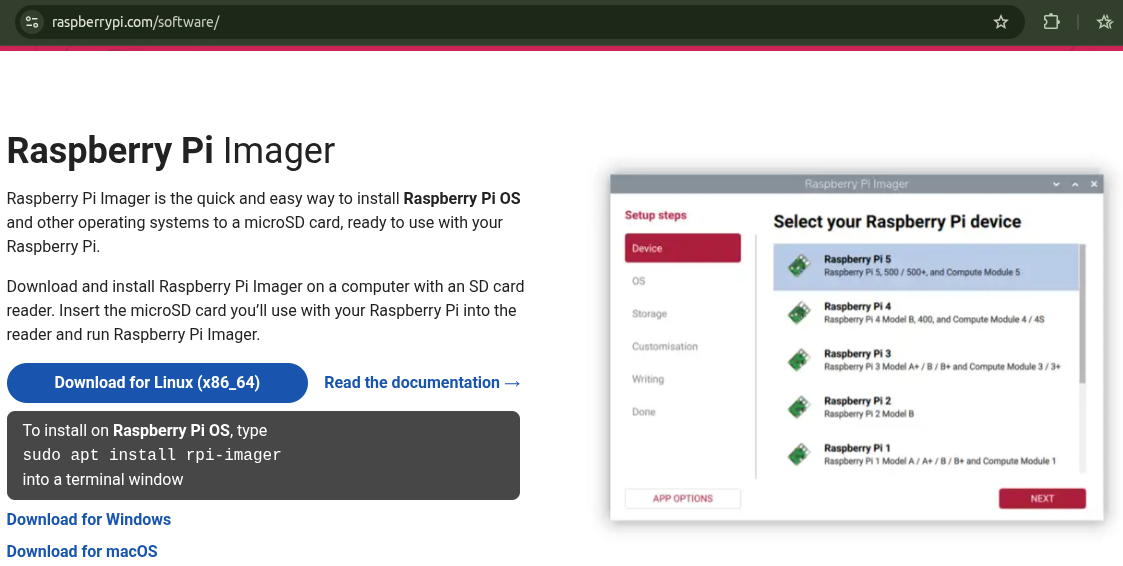
1.2. Downloading the Raspberry Pi Imager Utility
Download the Raspberry Pi Imager program to your computer (Windows, Mac, or Linux):
Go to the download page: Raspberry Pi Imager
For Windows
Download the latest version from the Raspberry Pi website. Run the installer.
For MacOS
Download the latest version from the Raspberry Pi website. Run the installer.
For Linux
Download the latest version of the AppImage file and make it executable:
sudo chmod +x imager_<version>.AppImage
or
right-click on the file > properties > permissions > make the file executable
Run the AppImage file. Click on the file or enter in the terminal:
sudo ./imager_<version>.AppImage
If you encounter any issues running the downloaded AppImage package, you can try downloading the package via:
sudo snap install rpi-imager or sudo apt install rpi-imager
and run it via:
sudo rpi-imager
1.3. OS Installation
1.3.1. Launching Raspberry Pi Imager
Launch the Raspberry Pi Imager application using one of the following methods:
- Find it in the applications menu.
- Click the Raspberry Pi Imager icon on the desktop.
- Run the AppImage file with administrator privileges. For example, using the command: sudo ./Raspberry_Pi_Imager-2.0.0-desktop-x86_64.AppImage
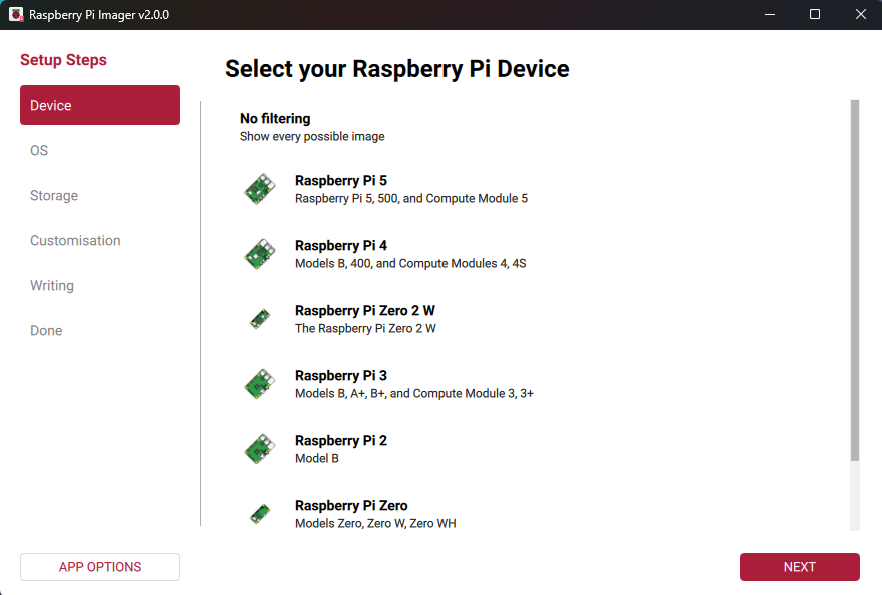
On the Device tab, select your Raspberry Pi model from the list. Click Next.
1.3.2. Configuring Basic Settings
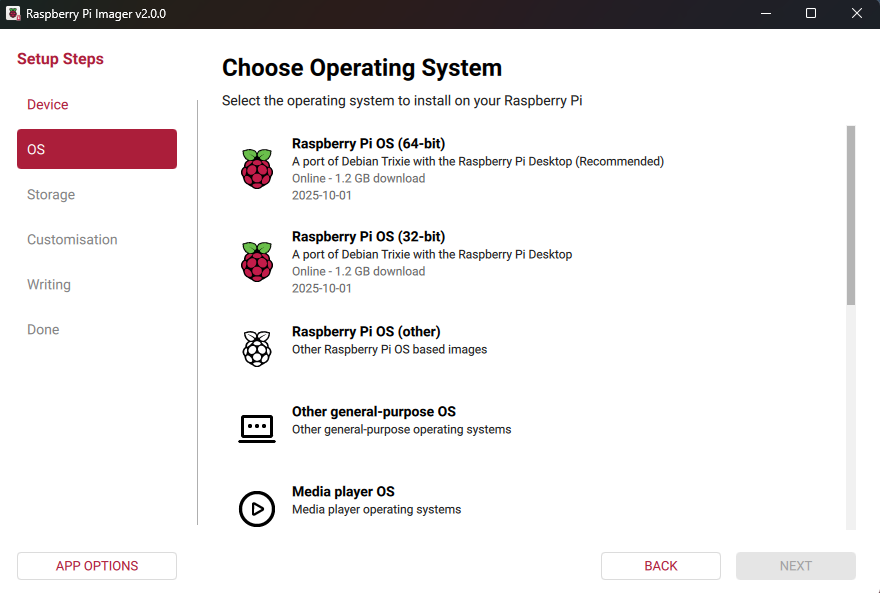
- Select an OS image from the list.
-
Select the SD card (“Storage”).
On the Storage tab, choose the storage device to which the image should be written. Click Next.
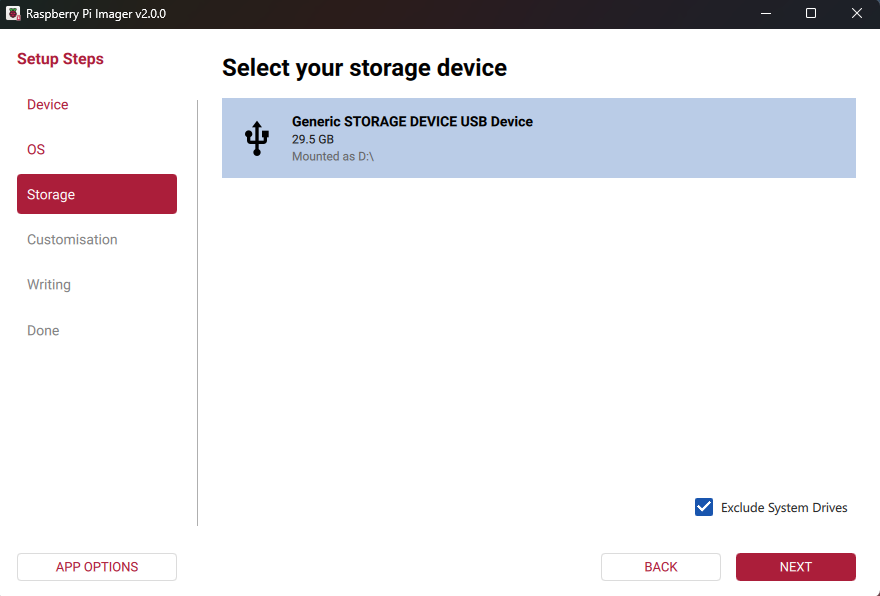
Sometimes, when selecting a storage device, you might see an empty list.
In this case, uncheck "Hide system drives" (or similar) and select your SD card.Attention!
If multiple storage devices are connected to your computer, make sure to select the correct one (the SD card)! Storage devices can often be identified by their size. If you are unsure, disconnect other devices until you identify the one you need to image. The Imager program will issue a warning if you try to overwrite a system drive on your computer.
1.3.3. Operating System Configuration
-
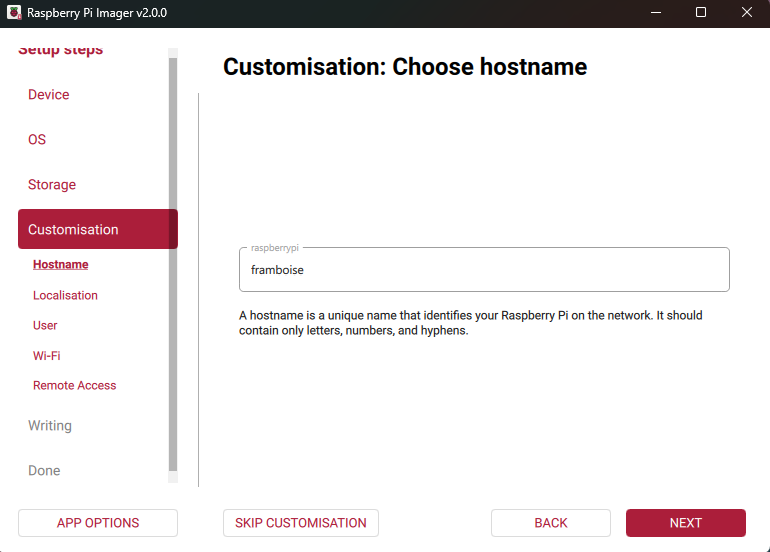
On the Settings > Hostname tab, enter a hostname for your Raspberry Pi consisting only of letters, numbers, and hyphens. Click Next.
-
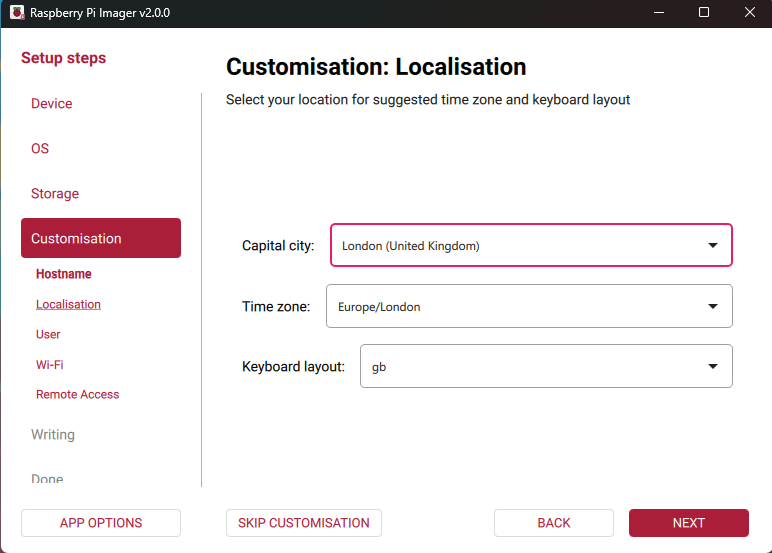
On the Settings > Localisation tab, select the capital of your country. Imager will automatically fill in the time zone and keyboard layout for this city; you can change these settings. Your selection also determines the Wi-Fi regulatory domain; the regulatory domain always corresponds to the selected capital. Click Next.
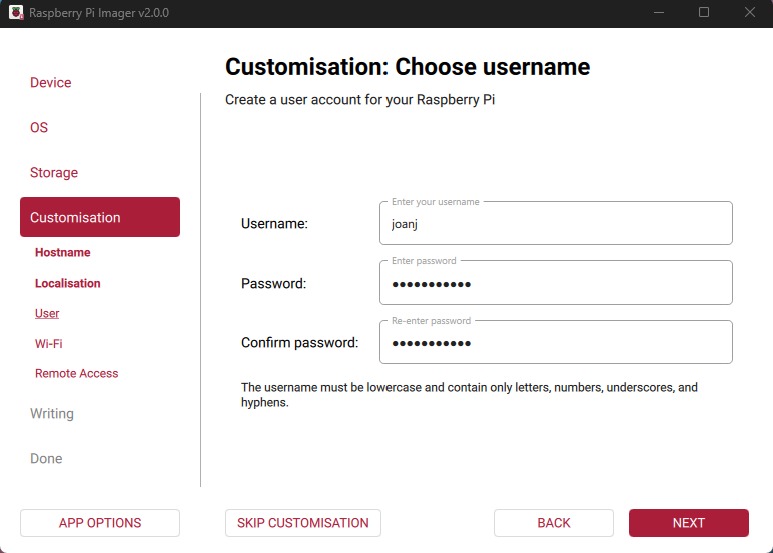
- On the Settings > Username and Password tab, enter a username and password (e.g., login:
pi, password:raspberry, or your own) for your Raspberry Pi administrator. Click Next.
-
On the Settings > Wireless LAN tab, during first use, Imager automatically enters the SSID (name) and password of the Wi-Fi network you are currently connected to.

-
ATTENTION! You must clear all settings in this section, so it looks like this:
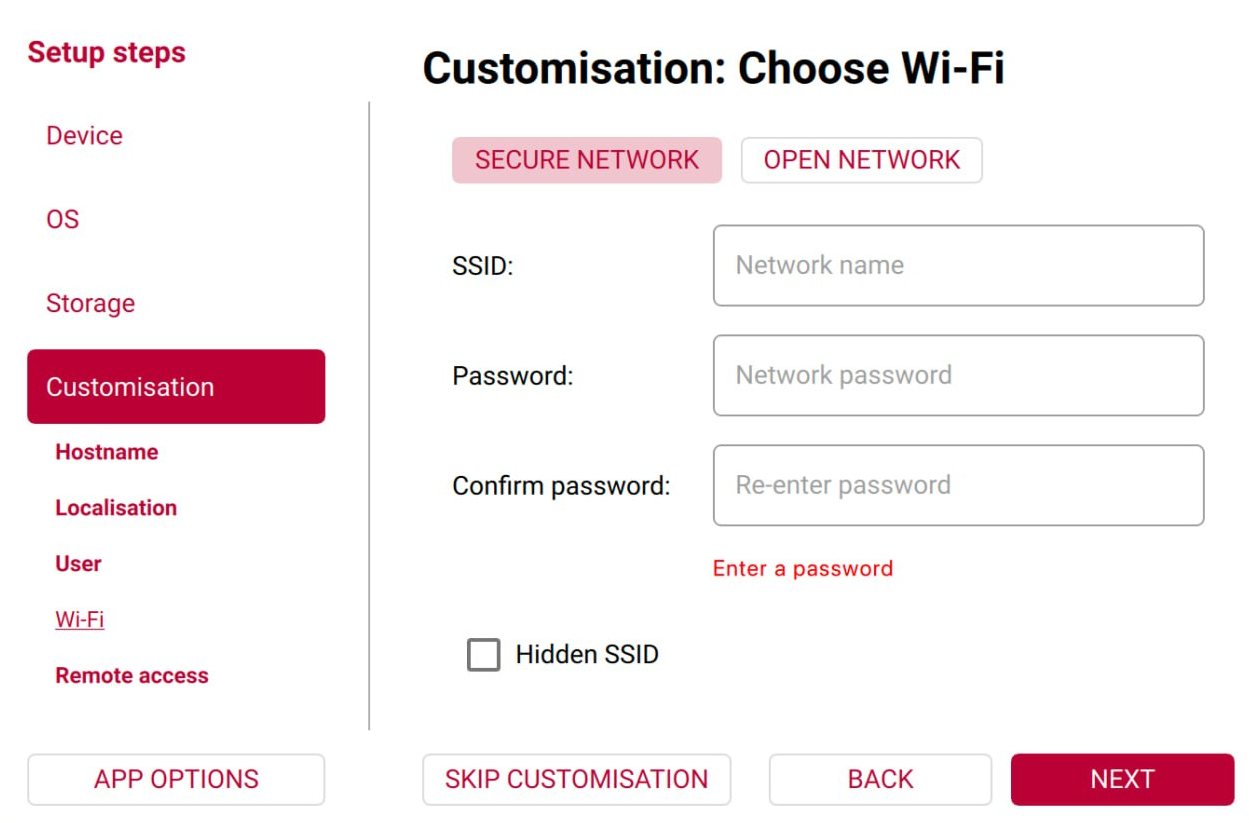
The network settings must be empty because we will be broadcasting Wi-Fi ourselves, not connecting to it. Just connect the Raspberry Pi with a cable to your router so they are on the same local network. -
On the Settings > Services (Remote Access) tab, configure the SSH settings.
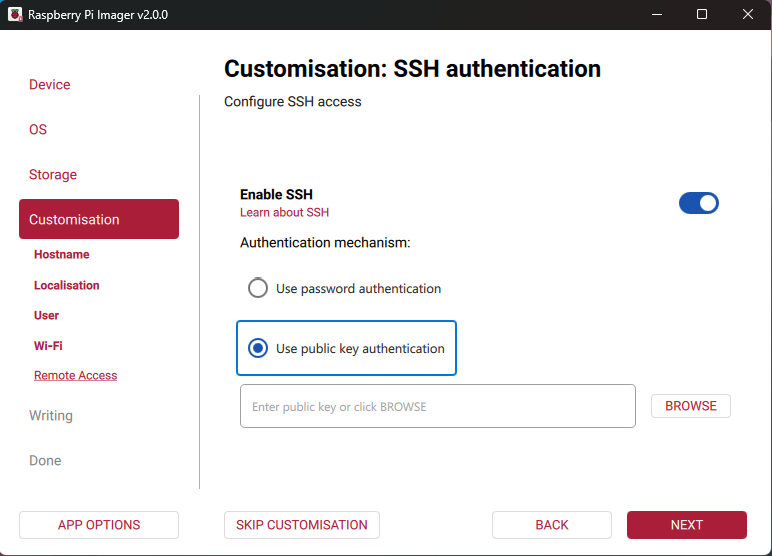
Toggle the Enable SSH switch to the active position. -
In some operating systems, a Settings > Raspberry Pi Connect tab is now displayed.
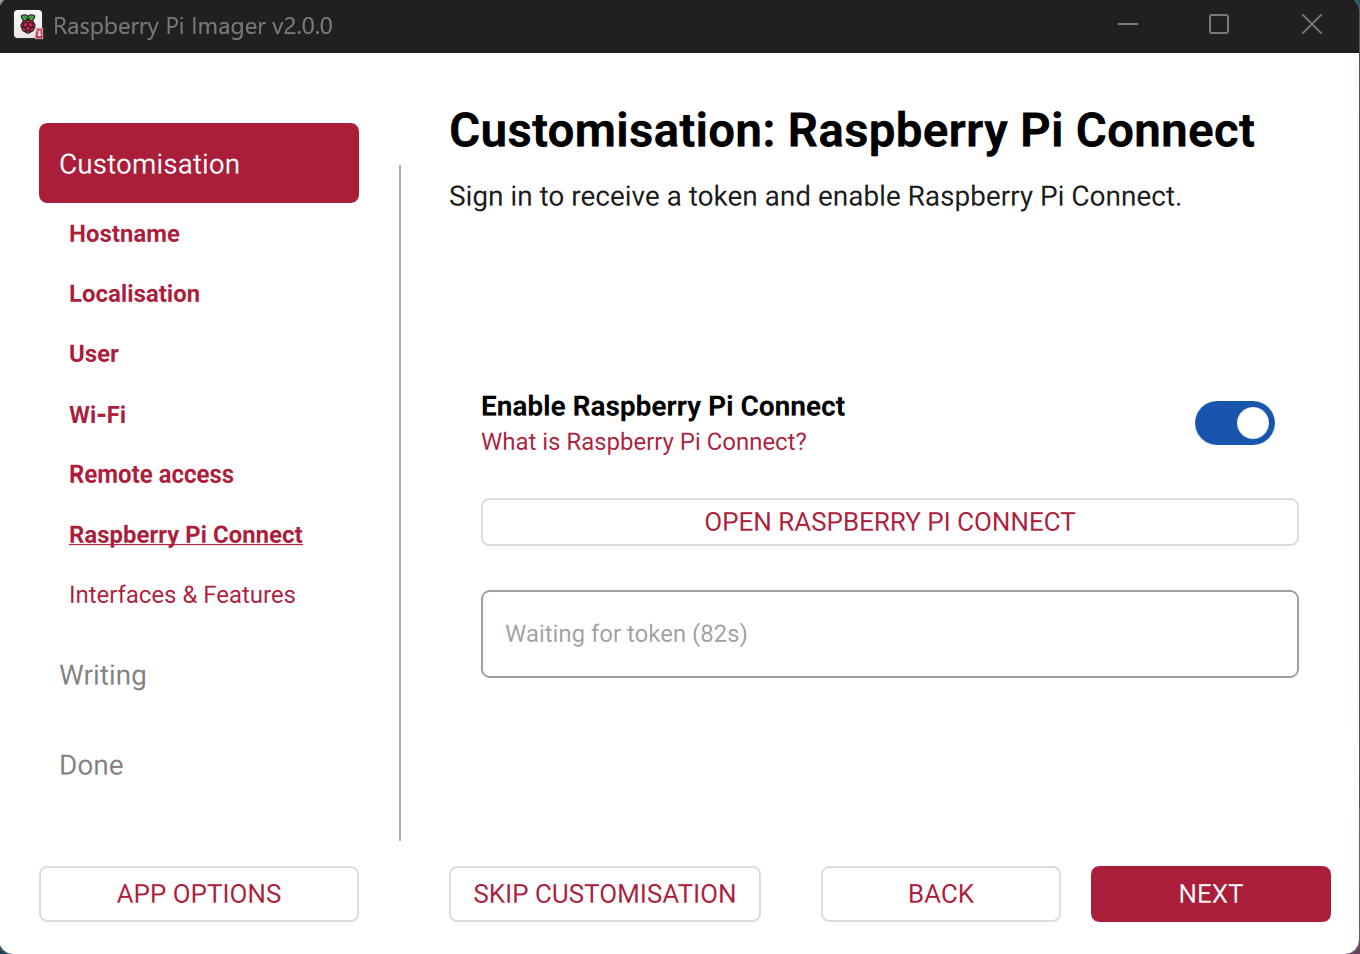
No configuration is needed here - just click NEXT. -
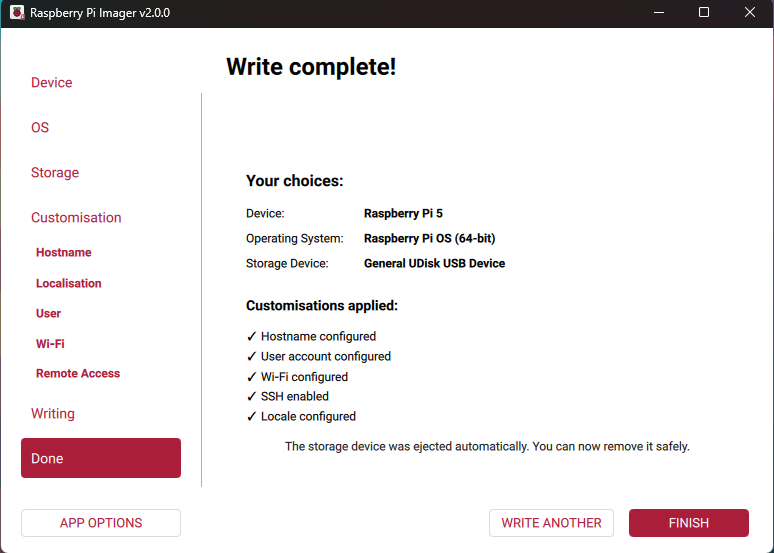
The final settings should look like this:
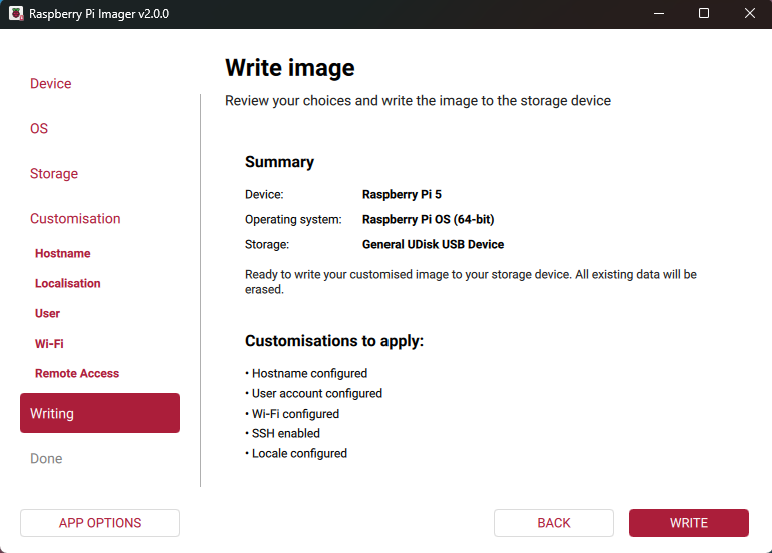
-
After that, click "WRITE" and wait for the writing process to finish.
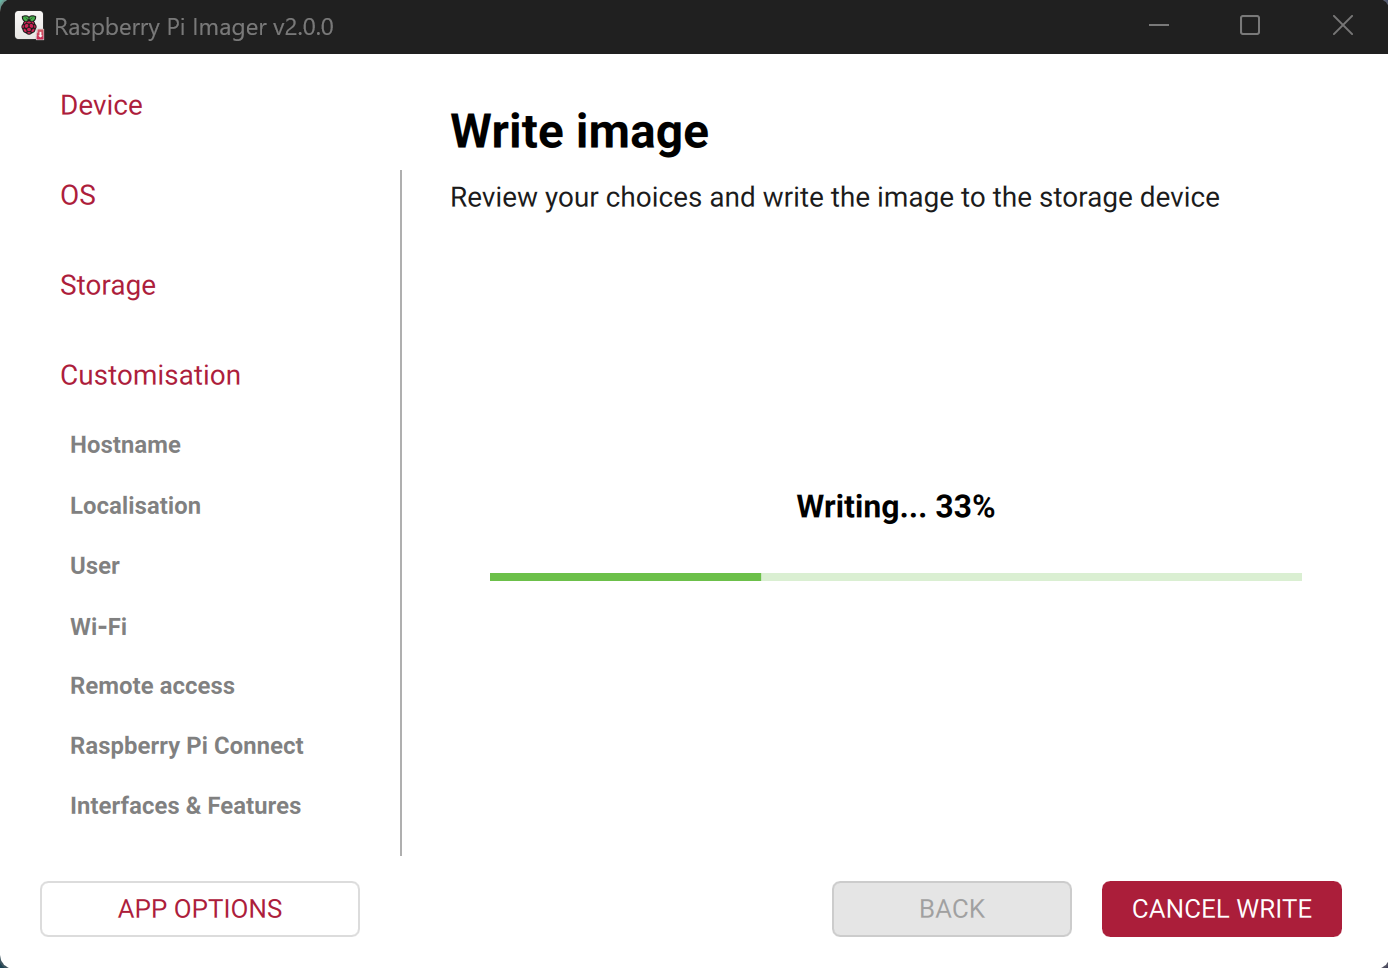
-
When the writing is complete, remove the SD card from the adapter and insert it into the Raspberry Pi.
2. Initial Raspberry Pi Setup and SSH Connection
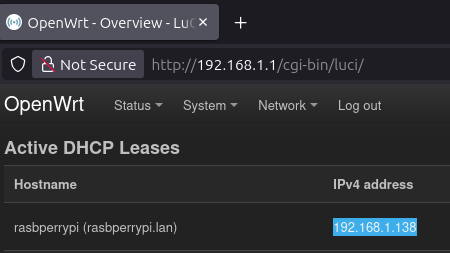
- Connect the Raspberry Pi with a patch cord (Ethernet cable) to the LAN port of your router so it is on the same network as your computer.
- Determine the new Raspberry Pi's IP address by accessing your router's admin panel (it will show all network clients; you need to find the unfamiliar IP, for example
192.168.0.10).
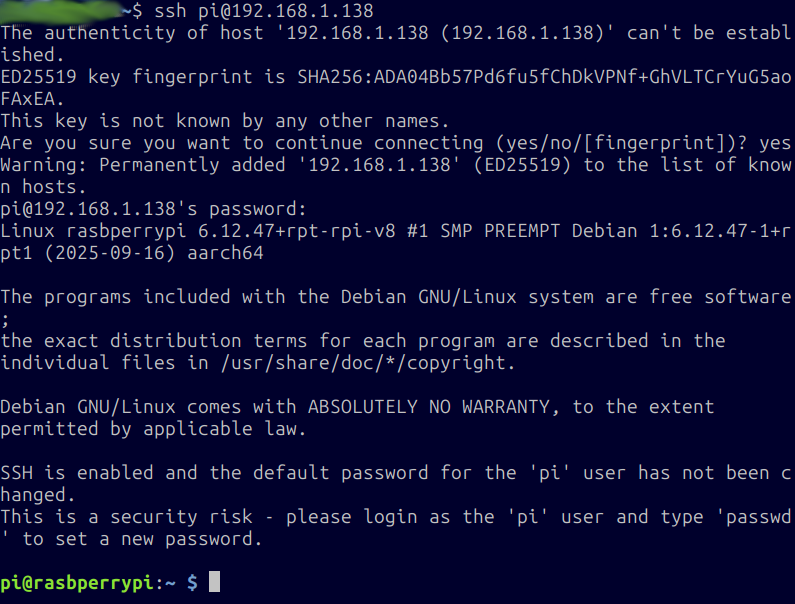
- Connect to the Raspberry Pi via SSH:
From Windows, this can be done using PuTTY or any other SSH client.
From Linux/MacOS – using the command:
ssh pi@192.168.0.10
(wherepiis your login, and192.168.0.10is the Raspberry Pi's IP address).
If you couldn't determine the Raspberry Pi's IP address, try:
ssh pi@raspberrypi.local
Please note that when typing a password in the SSH terminal, the characters are not displayed (this is normal).
-
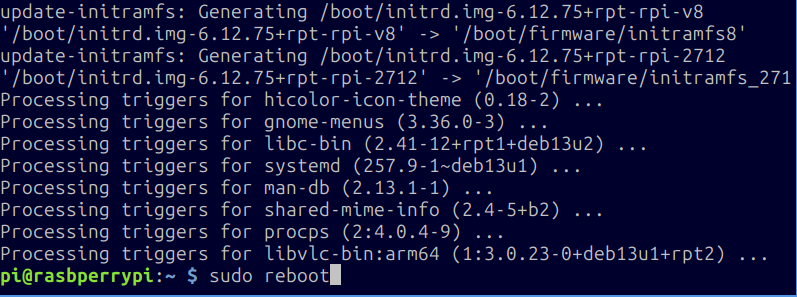
Update the system by entering in the terminal:
sudo apt update && sudo apt upgrade -y
Wait for the update process to finish - do not close the terminal window.
-
Reboot the device with
sudo rebootto apply the updated OS kernel settings. After that, log into the device again usingssh pi@192.168.1.<your ip>. - Configure the Wi-Fi country code by entering:
sudo raspi-configand in the menu that appears, navigate toLocalisation Options → WLAN Countryand select any country - this does not affect anything, but it must be set for Wi-Fi to start.
2.1. Proper Handling of Raspberry Pi to Avoid Damage
Important: Do not turn off the Raspberry Pi by unplugging it from the power source (pulling it out of the socket), as this can damage the microSD memory card.
ZloyRouter (like any other software) cannot physically damage your device under any circumstances.
1. Safe Shutdown (Software)
The most correct way to shut down the Raspberry Pi is through system commands: sudo shutdown -h now or sudo halt.
2. Wake up (Hardware)
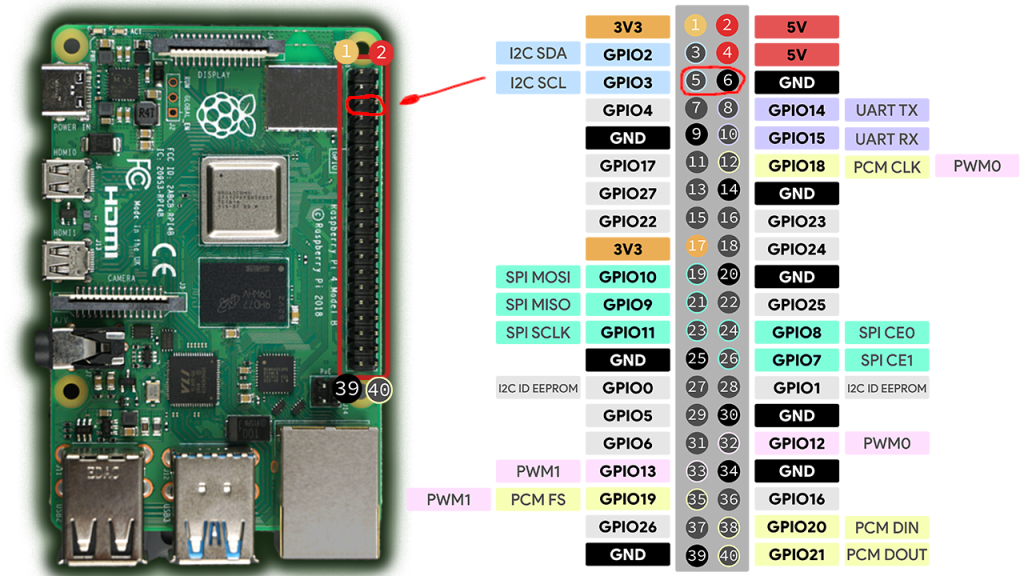
If the Raspberry Pi was safely shut down via the system (shutdown command) but the power supply is still plugged into the socket (red LED is on), shortly bridging Pin 5 (GPIO 3) and Pin 6 (GND) will wake up the board, and it will start booting.
3. Safe Shutdown (Hardware)
It is intentionally designed so that "out of the box" an accidental pin shorting does not lead to data loss and abrupt shutdown. Therefore, by default, the OS does not monitor these pins.
However, the system has a built-in official feature that allows using these same pins for safe shutdown:
1. Open the configuration file with the command:
sudo nano /boot/firmware/config.txt
2. Add the following line to the very end of the file:
dtoverlay=gpio-shutdown
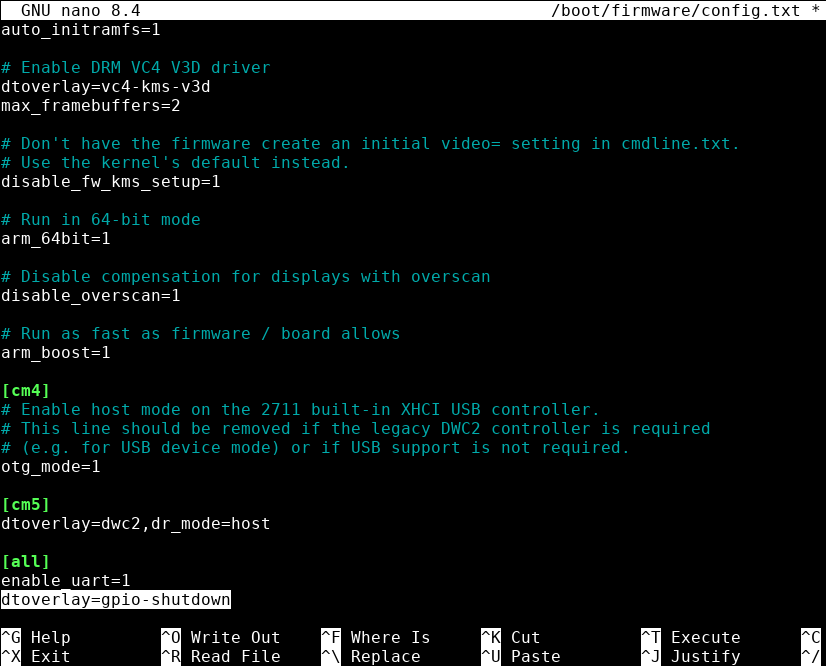
3. Save the changes and exit nano by pressing Ctrl+X on the keyboard (You will be asked Save modified buffer? - agree by pressing Y on the keyboard) and reboot the Raspberry Pi via sudo reboot.
After this, shortly bridging Pin 5 and Pin 6 will send a command to the operating system to safely close all programs and park the file system (analogous to the power button on a PC case).
As a result, Pin 5 (GPIO 3) and Pin 6 (GND) will act as a single On/Off button.
3. Installing ZloyRouter
3.1. Checking CPU Architecture
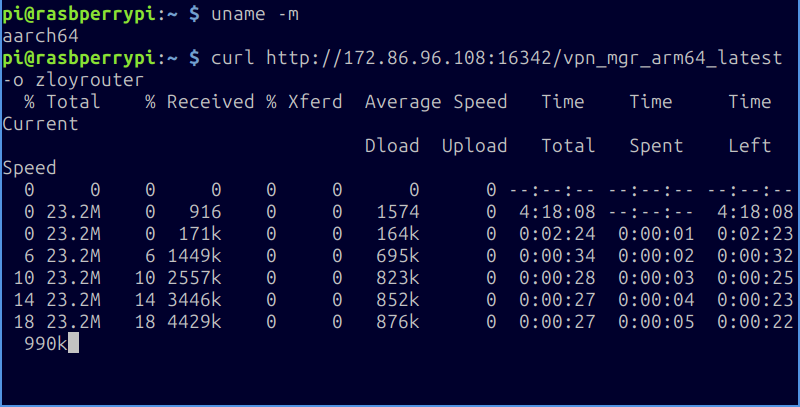
- Execute the command:
uname -m - Depending on the result, there are several options:
armv7l– means you need the filevpn_mgr_armv7_latest
aarch64(orarm64) – means you need the filevpn_mgr_arm64_latest
x86_64(rare on Raspberry Pi, but occurs for regular PCs) –vpn_mgr_amd64_latest
3.2. Downloading the Required Binary
- For armv7:
curl http://172.86.96.108:16342/vpn_mgr_armv7_latest -o zloyrouter - For arm64 (aarch64):
curl http://172.86.96.108:16342/vpn_mgr_arm64_latest -o zloyrouter - For amd64 (e.g., Ubuntu on PC):
curl http://172.86.96.108:16342/vpn_mgr_amd64_latest -o zloyrouter
3.3. Making the File Executable and Running It
- Grant execution rights:
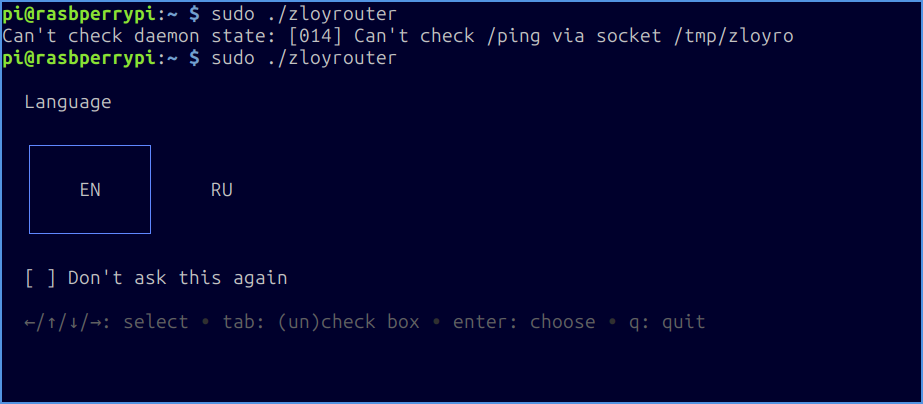
chmod +x zloyrouter - Run:
sudo ./zloyrouter -
Upon the first launch, the program will likely throw an error, but at the same time, it will display your License Key (a special hash).

This key needs to be provided (for example, to the ZloyRouter author) for activation.Please note! The key is unique, is tied to a specific device and is not reset after the system is reinstalled.
After activation, you will be able to fully use ZloyRouter.
If upon launching after activation you see the message:
Can't check daemon state: [014] Can't check /ping via socket /tmp/zloyrouter (or any other) - this means that your copy has not yet received the license from our licensing server. Wait a couple of minutes and try again, as shown in the image.
Attention! After installation and the first launch, control over ZloyRouter's operation is handed over to a system daemon. Even after exiting the configurator or closing the terminal window, ZloyRouter continues to run as a background Linux process.
Re-entering the commandsudo ./zloyrouterdoes not launch additional copies of the program, but simply opens the ZloyRouter management interface.
After the first launch, you will be prompted to select a language. Choose your preferred one and start working!