Diagnostics and troubleshooting
Instructions for collecting ZloyRouter diagnostic logs
Please follow these steps on your Raspberry Pi to collect diagnostic information (Read to the end). This will help us solve the problem.
Attention! We value your privacy and do not collect any data without your knowledge!
In order for logs to be collected, written to disk, and survive a device reboot, ZloyRouter must be run in persistent log support mode:
sudo ./zloyrouter -journald-persistent enable
After that, repeat the actions that led to the error and proceed to log collection.
1: Log collection on Raspberry Pi
- Connect to your Raspberry Pi via SSH.
Windows: Use the PuTTY program or the built-in SSH client in PowerShell/CMD (Open the "Start" menu, type Windows PowerShell, select Windows PowerShell, and then click the "Open" button.) and typessh pi@192.168.0.5(192.168.0.5 - replace with the actual IP address of your Raspberry_Pi)
macOS/Linux: Open the Terminal and run the commandssh pi@<IP_address_of_your_Raspberry_Pi>(replace pi with your user if it is different, andwith the actual IP address of your Raspberry Pi). - Create and run the log collection script.
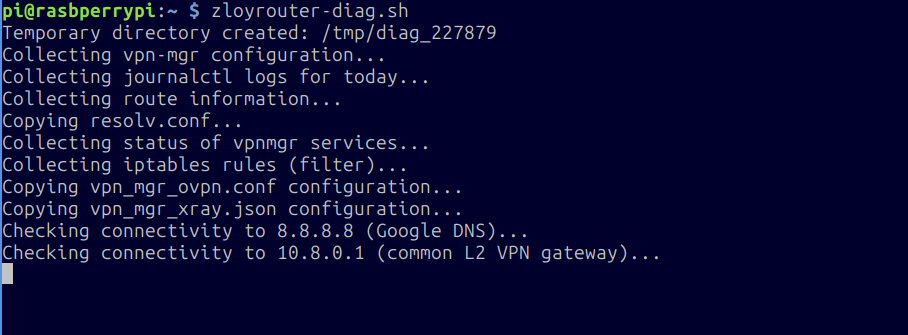
Enter the command:zloyrouter-diag.sh
- Wait for it to complete.
The script will start collecting information. This may take some time (a maximum of a minute or two). You will see progress messages.
Wait for a message like:
Archive created: /tmp/vpn_mgr_diag.YEARMONTHDAYHOURMINUTESECOND+OFFSET.tar.gz
Temporary directory /tmp/diag_XXXXX will be deleted **after a reboot**. (where XXXXX is the process PID)
This means that an archive file with logs was created in the /tmp/ directory on your Raspberry Pi, for example, vpn_mgr_diag.20231027153000+0300.tar.gz (the date and time will be current) - this is exactly what you need to download first to your PC and then send to our support.
Proceed to Part 2: Downloading the log file from the Raspberry Pi.
2: Downloading the log file from the Raspberry Pi to your local computer
You will need an SFTP client to download the file.
For Windows (using FileZilla):
- Installing the SFTP client (FileZilla):
Download the FileZilla Client from the official website: https://filezilla-project.org/download.php?type=client
Install the program following the installer's instructions. - Connecting to the Raspberry Pi via FileZilla:
Launch FileZilla.
Enter the connection details:
Host:sftp://<IP_address_of_your_Raspberry_Pi> (for example, sftp://192.168.1.100)
Username: pi (or your user)
Password: your password (default is raspberry)
Port**: 22
Click "Quickconnect"
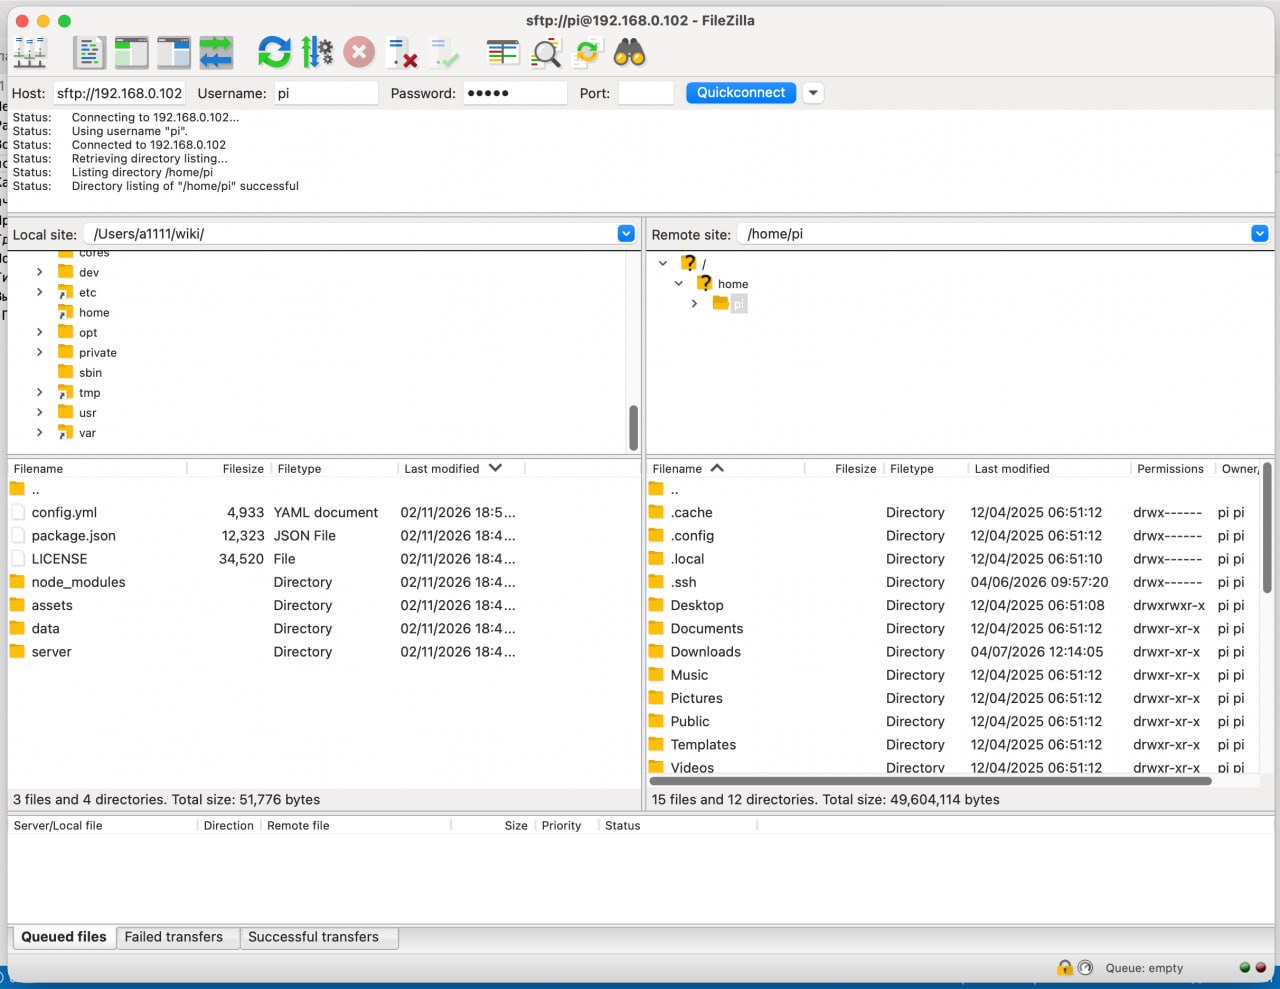
Upon the first login, you will see a key authorization window. Leave the "Always trust this host" checkbox checked and click OK.
After that, you will connect to your RaspberryPi and in the right window you will see the contents of the home folder/home/pi(or/home/<your_username>if you specified a username other thanpiduring installation) - Downloading the log file from the Raspberry to your PC:
In FileZilla:
The left side displays files on your computer.
The right side displays files on the Raspberry Pi.
In the right pane (files on the Raspberry Pi), navigate to the/tmpdirectory
To do this, in the Remote site field, instead of/home/pi(or/home/<your_username>if you specified a username other thanpiduring installation), type/tmp
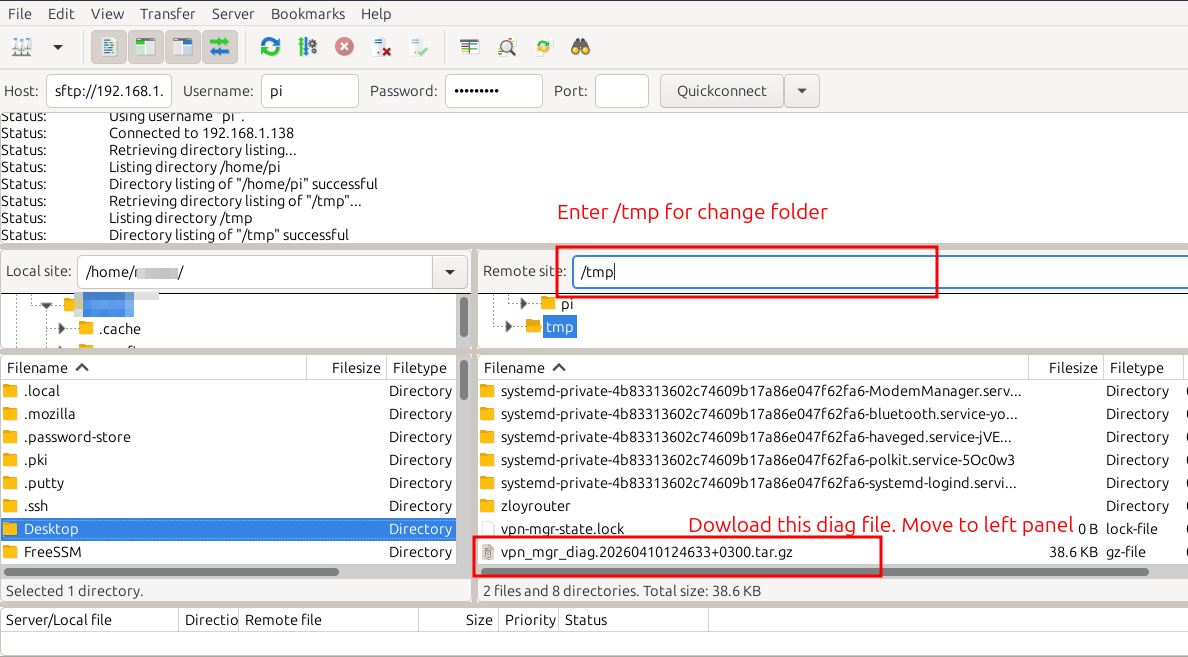
Find the file with a name like vpn_mgr_diag.YEARMONTHDAYHOURMINUTESECOND+OFFSET.tar.gz (for example, vpn_mgr_diag.20231027153000+0300.tar.gz).
Drag this file from the right pane (Raspberry Pi) to the left pane (your computer), for example, to the Desktop.
For macOS / Linux (using FileZilla):
- Installing the SFTP client (FileZilla):
Download the FileZilla Client from the official website: https://filezilla-project.org/download.php?type=client for your OS version. If the version is not detected automatically, look for yours here
Install the program following the installer's instructions. - The rest of the algorithm for downloading logs within FileZilla is the same as above for Windows
For macOS / Linux (using the Terminal):
Attention: You need to download the logs from the Raspberry Pi to your PC and send them to technical support. The commands below must be executed on your local PC running Linux/MacOS, not on the Raspberry Pi.
If you just copy and paste the commands below, they will not work. Adapt them to your configuration.
- Open the Terminal.
- Use the
scpcommand to download the file:
Run the following command, replacingwith the IP address of your Raspberry Pi, and pi with your username if it is different. The file will be copied to your home folder.
scp pi@<IP_address_of_your_Raspberry_Pi>:/tmp/vpn_mgr_diag.<timestamp>.tar.gz .
Where:
scp - the copy command from the Raspberry Pi to your PC where you run it.
pi - before the @ symbol is the username. By default in Raspberry it is pi, but if you set a different name during system installation, specify it.
- is the address of your Raspberry Pi in the format 192.168.1.100. Specify the address of your Raspberry Pi here.
/tmp/vpn_mgr_diag..tar.gz - the path to the file and the filename of the collected diagnostics.is "YEARMONTHDAYHOURMINUTESECOND+OFFSET". Use the filename from the message received at the diagnostics collection stage: Archive created: /tmp/vpn_mgr_diag.YEARMONTHDAYHOURMINUTESECOND+OFFSET.tar.gz
. (dot) - means copy to the directory you are currently in. You can specify your own if needed.
For example:
scp pi@192.168.1.100:/tmp/vpn_mgr_diag.20231027153000+0300.tar.gz .
When executing the command, after pressing Enter, you will be prompted to enter the password for the pi user (or your user) on the Raspberry Pi. While typing, the password will not be displayed - this is normal for security reasons. Enter the password and press Enter.Note: If there are multiple files on the Raspberry Pi starting with vpn_mgr_diag. and ending with .tar.gz in /tmp/, the scp command may output an error or copy multiple files. Make sure there is only one relevant file there or specify the exact filename.
3: Sending the file and cleanup
Send the downloaded vpn_mgr_diag.*.tar.gz file to us for analysis.
🛡 Security rules for transmitting logs:
If you send the log file directly as a file in Telegram to technical support — nothing else needs to be done.
If the file is too large or you use public file-sharing services (e.g., Dropmefiles, fex.net, etc.):
1. On your computer, pack the downloaded .tar.gz file into a .ZIP or .RAR archive with a mandatory password.
2. Do not rely on file-sharing features like "delete after one download" — the password must be set precisely on the archive itself!
3. Send the download link to support, and provide the password in a separate message.