Hardware required to run ZloyRouter
Below is a list of recommended hardware verified by our users. If any equipment is out of stock, look for similar offers of the same class and price range.
Raspberry Pi4/5 with 2/4Gb RAM
ZloyRouter is a hardware and software solution that uses Raspberry Pi4/5 as its platform.
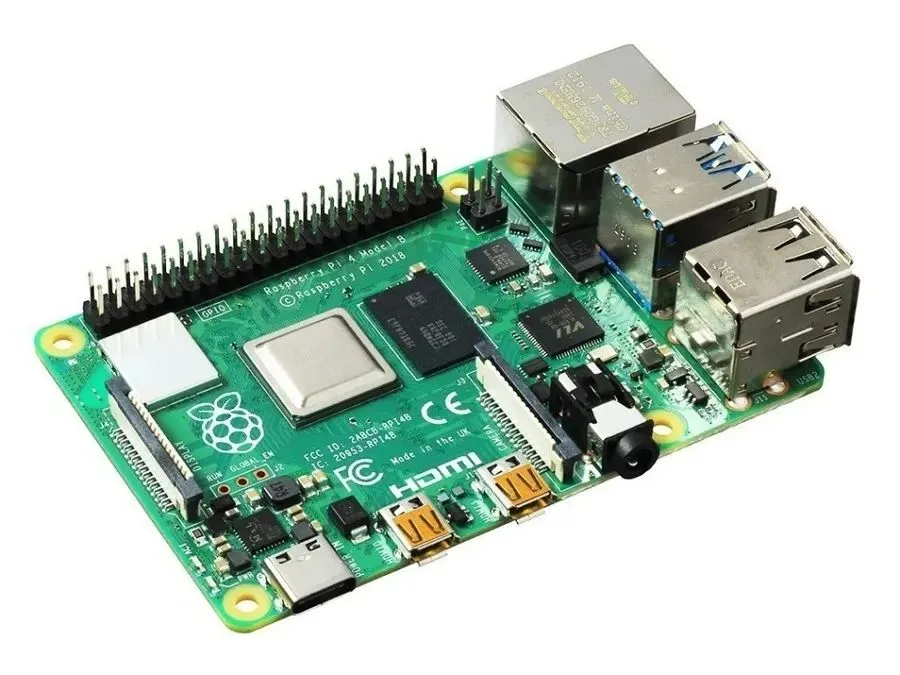
We do not sell hardware. You can purchase a Raspberry Pi4 using the marketplace links:
2Gb RAM version on OZON / AMAZON
ZloyRouter has low resource requirements, but strategically, it is better to purchase the 4Gb RAM version on OZON / AMAZON
If the product is not available via the provided links, look for any similar one from the recommendations.
Heatsink for Raspberry
Heatsink on OZON
Raspberry Power Supply
Power supply on OZON
Memory card for Raspberry Pi
The card packaging must have the following markings:
- Class A1 or A2 (Application Performance Class): This is the most important parameter! Class A1 guarantees a minimum of 1500 read operations and 500 write operations per second (IOPS). Class A2 guarantees 4000 read and 2000 write operations.
- Class 10 or U1 / U3: Guarantees a minimum overall speed
You cannot use anything lower than Class 10 for the OS!
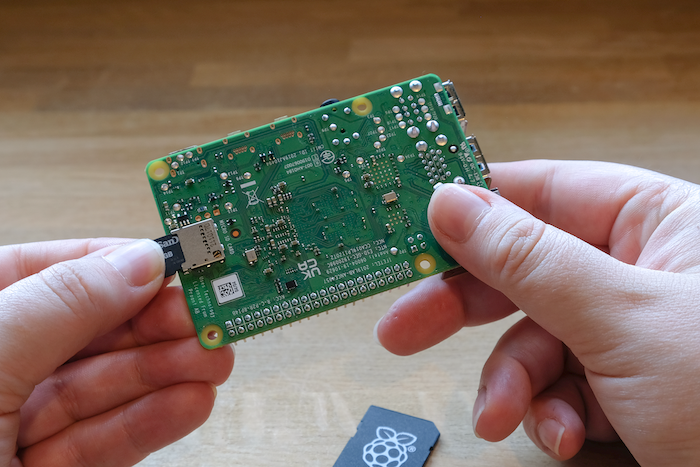
Recommended memory cards (64Gb and above):
- Samsung PRO Endurance on OZON | AMAZON
- SanDisk High Endurance / SanDisk MAX Endurance on OZON | AMAZON
- Kingston High Endurance on OZON | AMAZON
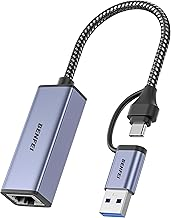
Card Reader
Required to write the OS image to the flash drive. Cheap noname card readers often kill flash drives.
We recommend using accessories from trusted manufacturers such as: Baseus, Ugreen, Belkin

USB Card Reader on OZON | AMAZON
Connection cable (as long as needed)
Required to connect the Raspberry to your router
UTP cable (patch cord) on OZON
Ethernet (RJ45) network adapters for phones and laptops (optional)
If you plan to connect your working devices to ZloyRouter via cable (for maximum anonymity and hardware disabling of Wi-Fi/Bluetooth/GPS on the phone), you will need adapters. Most modern smartphones and thin laptops (including Apple devices) lack a built-in Ethernet port.
We recommend using accessories from trusted manufacturers such as: Baseus, Ugreen, Belkin
Depending on your working device, you will need one of the following options:
1. For iPhone (up to 14 series inclusive) and older iPads (Lightning connector)
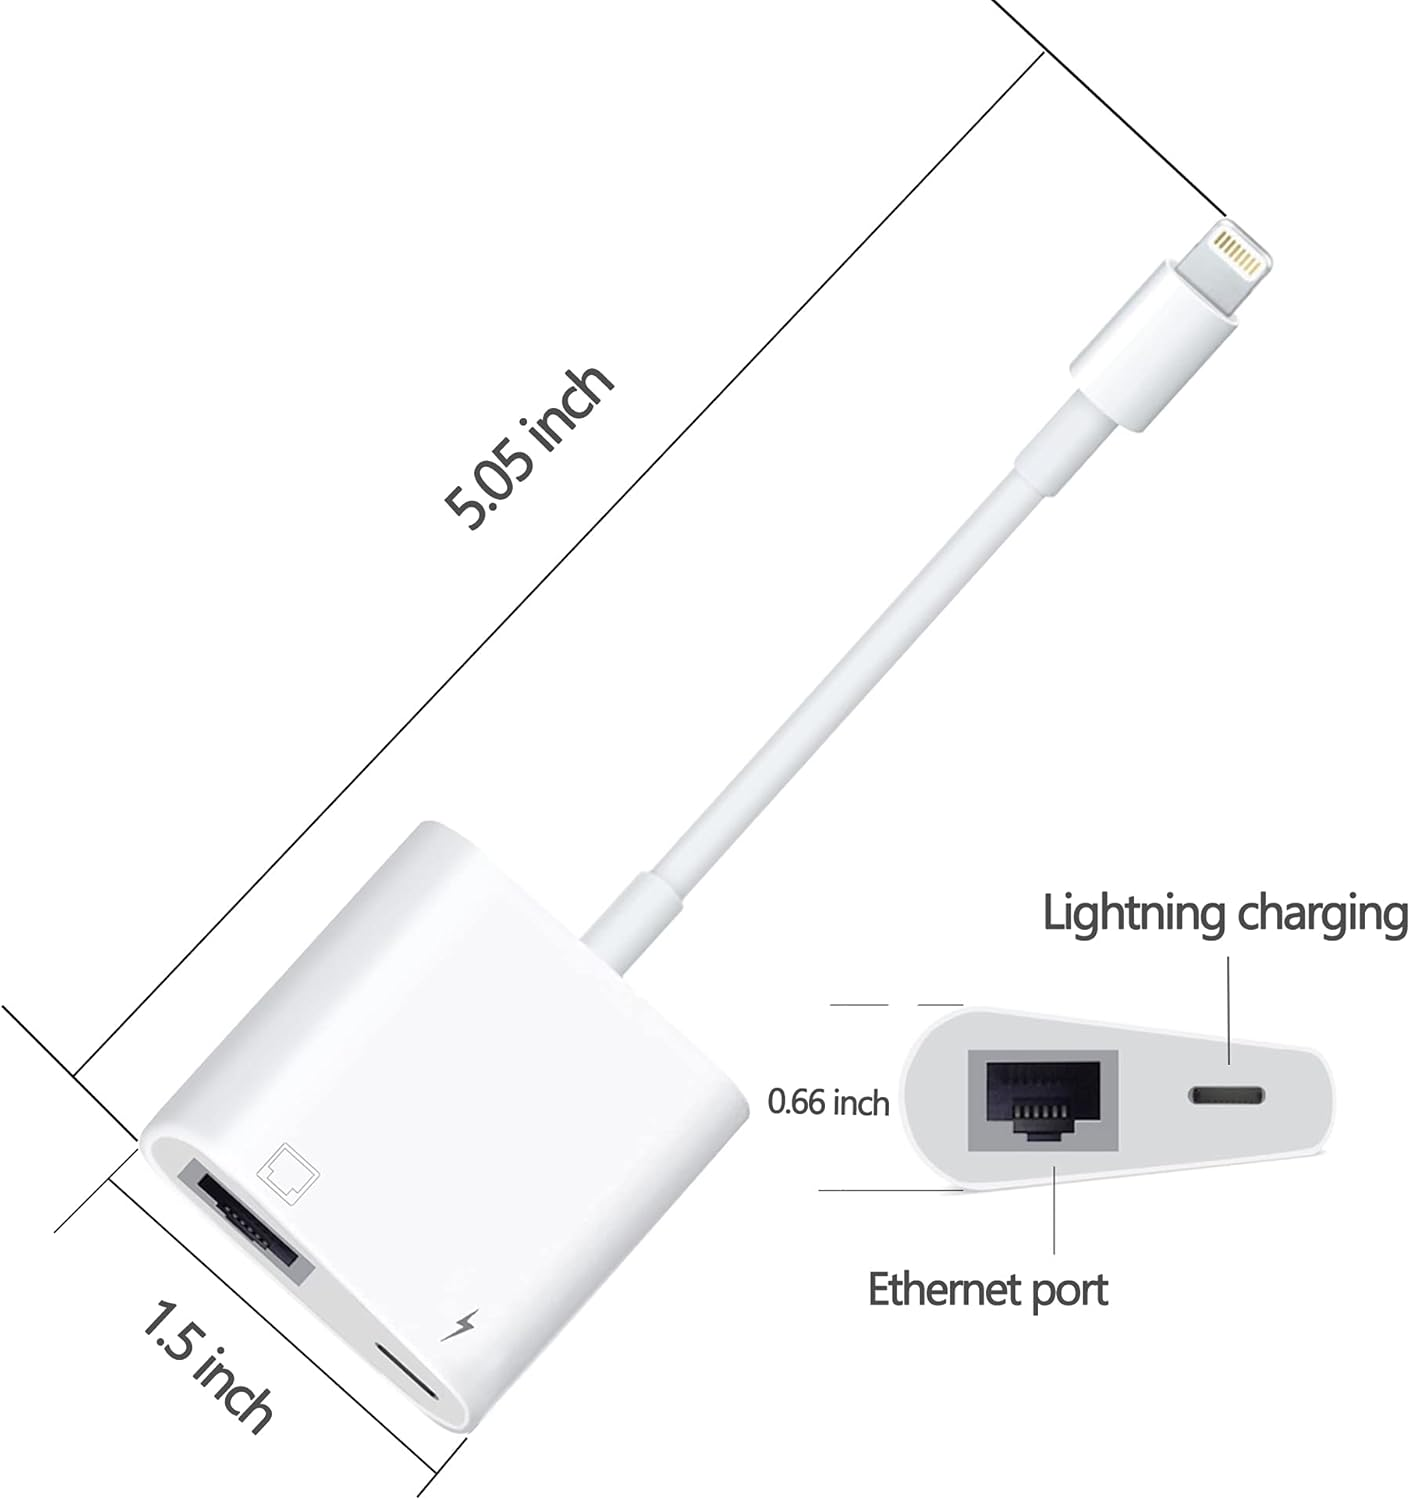
Important detail: iOS very strictly controls power consumption. Standard adapters without additional power often return an "Accessory consumes too much power" error and disconnect.
- What to buy: Strictly adapters that, in addition to the internet cable port (RJ45), have an additional Lightning port for charging connection.
- Links: Lightning to Ethernet + Power adapter on OZON | AMAZON | Apple
Alternative adapter models for search:
- Apple USB Ethernet,
- Buffalo LUA-U2-GT
- Linksys USB200M
- Linksys USB1000
- IO-Data ETG-US2
- Belkin F5D5055
2. For iPhone 15 and newer, modern iPads and Android smartphones (USB Type-C connector)
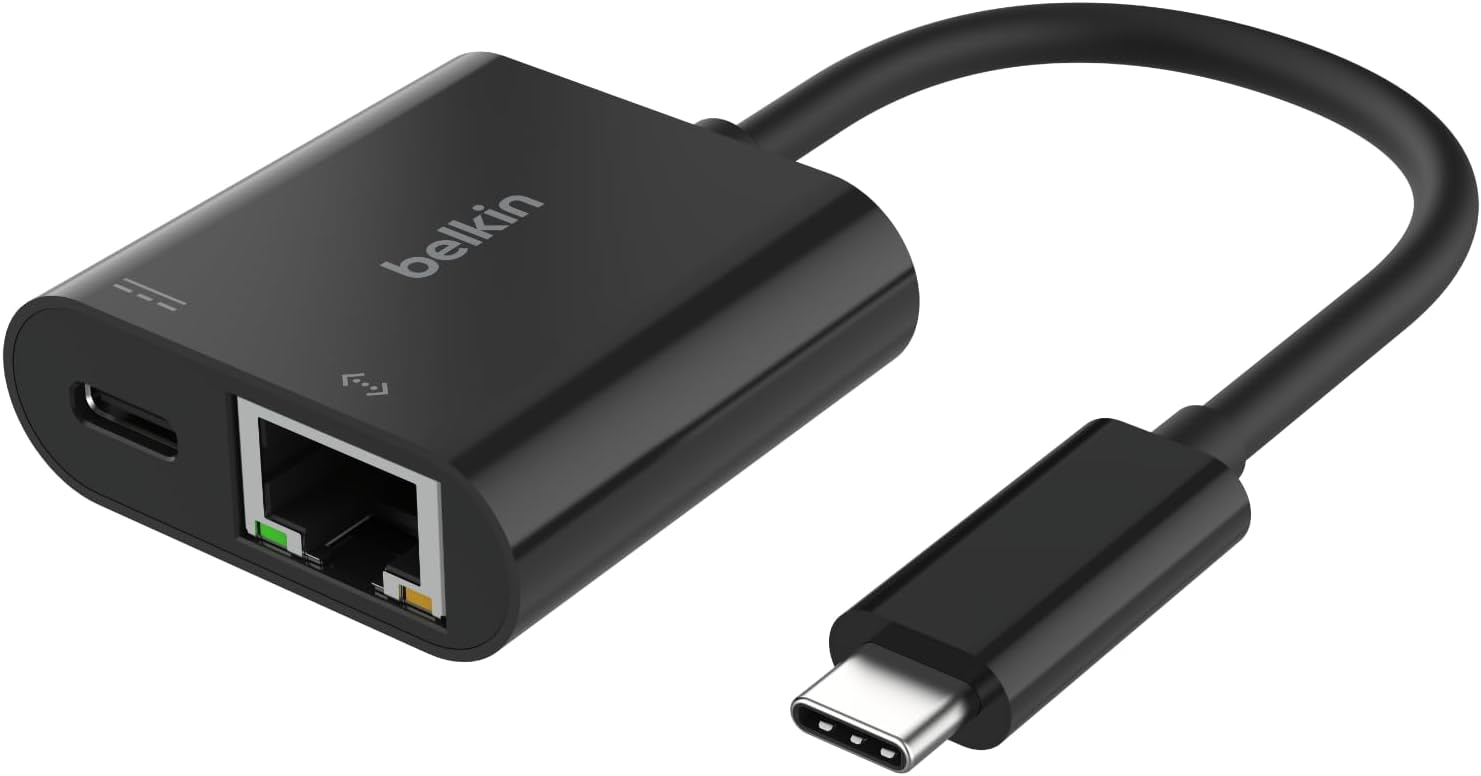
Important detail: Starting from the 15th series, Apple (iPad, iPhone 16 Pro/Pro Max) switched to Type-C, so old Lightning adapters will not work. Android devices also work via Type-C. The main rule here is that internet via cable heavily drains the smartphone's battery.
- What to buy: Type-C to Ethernet adapters with PD (Power Delivery) technology support — that is, with an additional Type-C port to charge the phone while working. For Android, it is best to choose devices from UGREEN or Baseus (they use compatible Realtek/ASIX chips that work on a Plug-and-Play basis).
- Links: Type-C to Ethernet + PD Charging adapter on OZON | AMAZON | Apple.com
3. For MacBooks and modern Windows laptops (Type-C or USB-A connector)
You will need such an adapter if you plan to connect your ultrabook to the internet through the Raspberry with ZloyRouter using wires only and do not use the Wi-Fi internet tethering from the Raspberry PI (Wi-Fi HotSpot).
Important detail: Modern MacBook Neo/Pro/Air M1, M2, M3, M4, M5 and Windows ultrabooks do not have a network cable port.
- What to buy: If you do not need to charge the laptop through the same port, the most standard and inexpensive adapter or USB hub with a built-in RJ45 port will do (If you also need to charge, look for a similar one but with additional power). Gigabit speed (1000 Mbps) will be more than enough.
- Links:
- Version for new laptops (Type-C) on OZON | AMAZON
- Version for old PCs (standard USB-A) on OZON | AMAZON
For more details on how to configure such connections on phones, solve issues with obtaining an IP address, and why this is necessary when working with anti-fraud systems, read the chapter "Tethering internet to a phone via cable" in the Usage section
USB Modem (optional)
If you plan to receive internet on the Raspberry from a mobile 4G network, it will be more convenient to purchase a USB 4G modem.
graph LR
    A[🗼 4G/LTE Cell Tower] -->|Radio channel| B[📶 USB 4G Modem]
    B -->|USB port| C(🍓 Raspberry Pi <br> ZloyRouter)
    C -->|Wi-Fi or Cable| D[💻 PC / Laptop]

    classDef zloy fill:#e74c3c,stroke:#c0392b,stroke-width:2px,color:#fff;
    class C zloy;
This is much more convenient than tethering internet from a phone and configuring routing.
We recommend choosing a USB 4G modem with Wi-Fi sharing, as this will significantly simplify the initial setup of the Raspberry Pi:
1. ZTE F30 Pro 4G Pocket WiFi
An excellent verified option is the ZTE F30 Pro 4G Pocket WiFi, which is detected by the Raspberry as a network card and immediately provides internet.
Moreover, this modem can share Wi-Fi - you can connect through it to the Raspberry Pi for the initial installation and configuration of ZloyRouter. Since it is the modem that acts as a router with DHCP and distributes IP addresses, your devices end up on the same network: typically the modem has the address 192.168.0.1, your Raspberry Pi is issued the IP address 192.168.0.2, and your PC gets 192.168.0.3.
- Where to buy in Russia: OZON Citilink
- Where to buy on Amazon: Very widely available. Search for "ZTE F30 Pro 4G Pocket WiFi" or use the direct link to an analog.
2. Huawei E3372 (modifications E3372h-153 or E3372h-320)
This is the most popular modem in the Raspberry Pi community. There is a huge amount of instructions for it, and in 99% of cases, it starts working immediately after connection.
- Where to buy in Russia: Ozon, Yandex.Market, Avito. Many unlocked versions with HiLink firmware are sold.
- Where to buy on Amazon: Search for "Huawei E3372 unlocked LTE". For example, this one
%% Important detail: A new version Brovi E3372-325 (Brovi is a Huawei sub-brand) has recently appeared on the market. It sometimes has issues in Linux due to stripped-down firmware. Try to look specifically for the classic h-153 or h-320 versions. %%
3. ZTE MF833 (modifications MF833V or MF833U1)
Since Huawei E3372 is gradually being discontinued, ZTE MF833 has become its main replacement. It is also very friendly with Linux, works in virtual network card mode, and does not require any extra hassle.
- Where to buy in Russia: Citilink, DNS, Ozon. Unlocked versions are sold (often in a white case without carrier logos).
- Where to buy on Amazon: Very widely available. Search for "ZTE MF833V Unlocked".
3. Quectel EC25-E (in a USB adapter or via a HAT board)
Standard "dongle" modems have one drawback — during round-the-clock (24/7) operation and active data transmission, they can overheat and freeze. If you need a reliable IoT solution, it is better to take an industrial communication module inserted into a USB adapter with a case.
- How it works: The module (for example, Quectel EC25) is inserted into a special USB adapter with a SIM card slot and antennas. In Linux, it works natively through QMI or MBIM interfaces.
- Where to buy in Russia: Electronics stores for developers (e.g., iRZ, Amperka, Supereyes), AliExpress (delivery to Russia), Ozon.
- Where to buy on Amazon: Search for "4G LTE USB Dongle with Quectel EC25" or expansion boards from Sixfab (Sixfab 3G/4G/LTE Base HAT).
Monitor (optional)
By default, all management of the Raspberry Pi and ZloyRouter is done via SSH and a monitor is not needed, but if necessary, you can connect your Raspberry to a standard monitor via HDMI or purchase a separate monitor for the Raspberry on OZON
First boot
- Connect the Raspberry with a cable to the router that distributes the internet.
- Install the operating system and ZloyRouter on the Raspberry Pi according to the instructions
- After powering on and configuring, ZloyRouter will start broadcasting a
ZloyWi-Fi network from the Raspberry with the correct DNS settings, to which you can now connect and work.
Proper handling of Raspberry Pi to avoid burning it out
Important: Do not turn off the Raspberry Pi by disconnecting it from the power source (pulling it out of the socket), as this may damage the microSD memory card. ZloyRouter (like any other program) is under no circumstances able to physically damage your device.
1. Safe shutdown (software)
The most correct way to turn off the Raspberry Pi is via the system commands sudo shutdown -h now or sudo halt
2. Power on (Wake up)
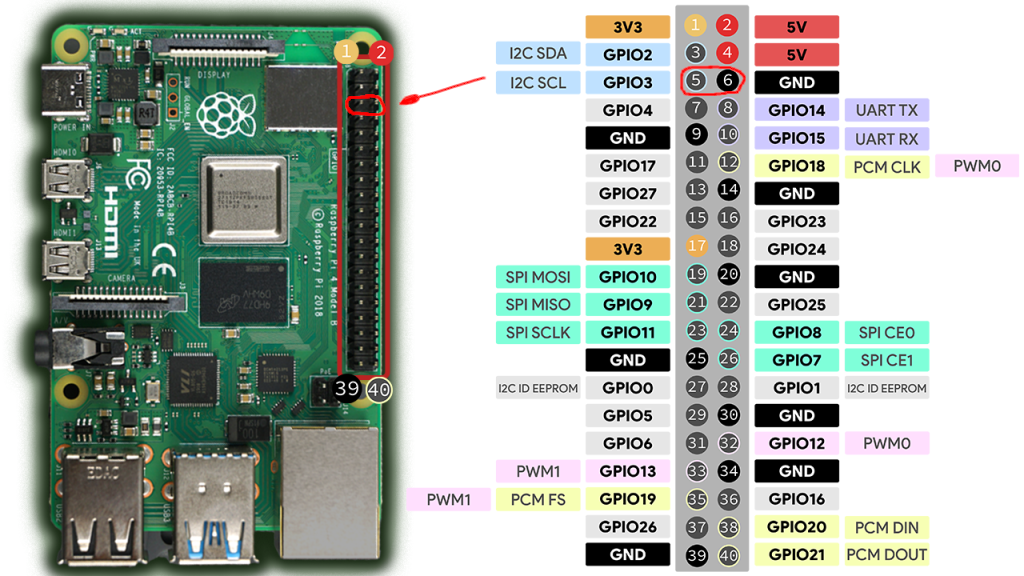
If the Raspberry Pi was safely shut down through the system (using the shutdown command), but the power supply is still plugged into the socket (the red LED is on), momentarily shorting Pin 5 (GPIO 3) and Pin 6 (GND) will wake up the board, and it will start booting.
3. Safe shutdown (hardware)
Described below is an additional and optional way to shut down your Raspberry PI. Everything will work perfectly without it, but in order to preserve the SD card - we recommend configuring this as well.
It is specifically designed so that "out of the box" an accidental shorting of the pins does not lead to data loss and an abrupt shutdown. Therefore, by default, the OS does not monitor these contacts.
However, the system has a built-in official function that allows using the exact same Pin 5 and Pin 6 for safe shutdown:
By default, Raspberry Pi OS is installed with a graphical interface (Desktop). If you short the contacts twice in a row (like a double mouse click), the Raspberry will shut down instantly:
- The first short brings up the menu.
- The second short acts as an "Confirm / Ok" button and triggers immediate shutdown.
Configuration:
1. Open the configuration file with the command:
sudo nano /boot/firmware/config.txt
2. Add the following line to the very end of the file:
dtoverlay=gpio-shutdown
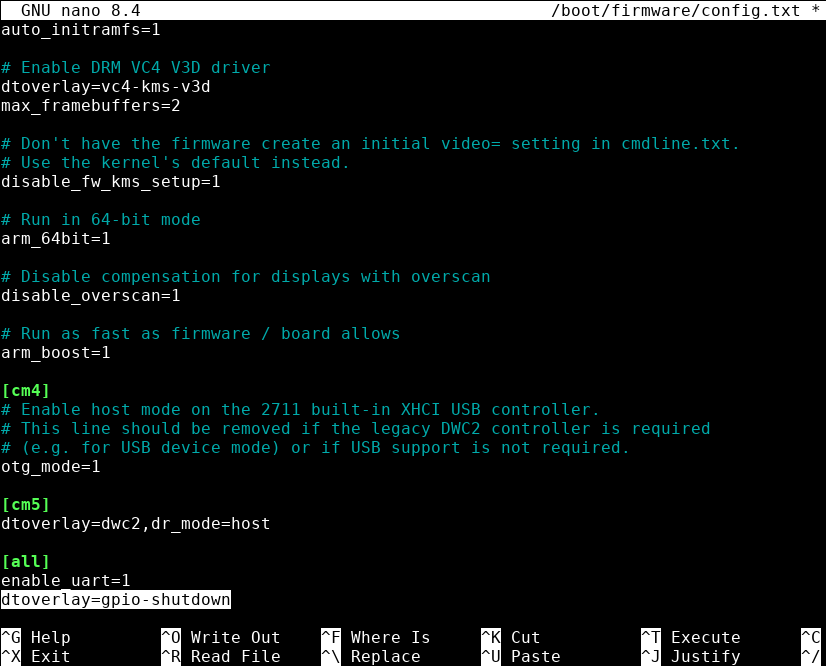
3. Save the changes and exit nano by pressing Ctrl+X on the keyboard (You will be asked Save modified buffer? - agree by pressing Y on the keyboard) and reboot the Raspberry Pi via sudo reboot.
After this, momentarily shorting Pin 5 and Pin 6 twice (like a double mouse click) will send a command to the operating system to safely close all programs and park the file system (similar to the power button on a PC system unit).
As a result, Pin 5 (GPIO 3) and Pin 6 (GND) will work as a single On/Off button.
> If your fan is connected to Pin 4 and Pin 6, you can short Pin 5 and Pin 6 directly with it.
How to determine if the SD card has died or entered the terminal "read-only" mode
The situation when the switch on the SD card is in the "Unlocked" position (top)
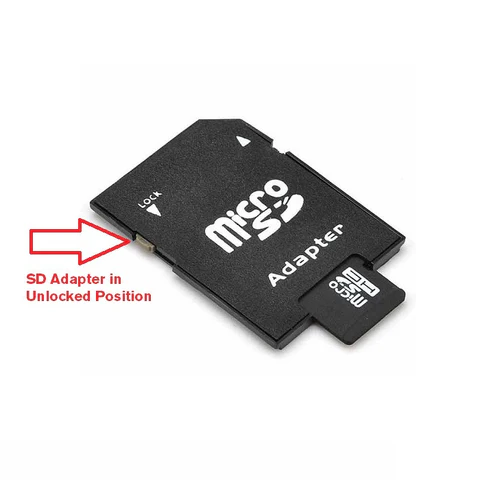
but the Raspberry Pi stubbornly reports that "the disk is write-protected", is very common.
There are 4 main reasons for this — from minor mechanical issues to the final "death" of the card itself.
1. The card has exhausted its resource (Hardware lock) — The most common reason for Raspberry Pi
This is the most important feature of flash memory. There is a microcontroller inside every SD card. When it realizes that the memory cells have worn out (the limit of rewrite cycles has been exhausted) or a serious internal failure has occurred, the controller permanently puts the card into "Read-Only" mode.
This is a protective mechanism: it is designed so that you do not lose your data and have time to copy it to a computer before the card finally dies.
* Symptoms: The card can be read, you can copy files from it. You can even try to format it or delete files — the system will pretend it deleted everything, but after reconnecting the card, all the files will be back in place.
* Solution: Unfortunately, this card can no longer be fixed. It needs to be copied and thrown away.
2. OS software protection triggered (File system errors)
If the Raspberry Pi or your computer detects critical errors in the file system (for example, the device was abruptly unplugged while writing a file), the operating system may intentionally block writing.
For example, Linux (Raspberry Pi OS), upon detecting damage, mounts the disk with the ro (read-only) parameter to prevent further data destruction.
* Solution: You need to check the card for errors using the fsck utility for the problematic partition.
Summary: how to check what exactly happened?
- Insert the card into a different card reader (preferably directly into a MicroSD USB dongle, bypassing the SD adapter with the slider). If the lock remains — the problem is in the card itself.
- Try creating a text file on the card, and then reconnect it. If the file disappears — your card has entered the terminal "read-only" mode. Copy the data and buy a new one (preferably High Endurance class, as discussed above).