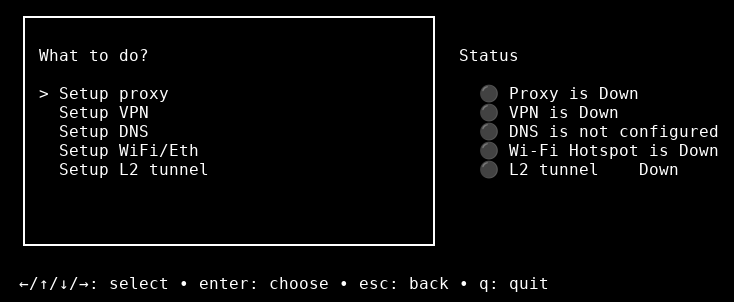
Using ZloyRouter
Running the program:
Open the terminal and run the command:
sudo ./zloyrouter
Wi-Fi Configuration
After selecting the system language, we move on to configuring the Wi-Fi Hot-Spot.
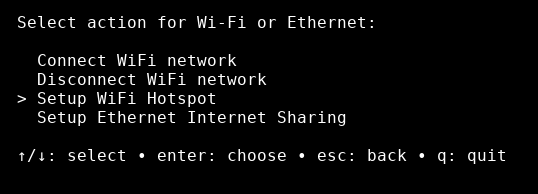
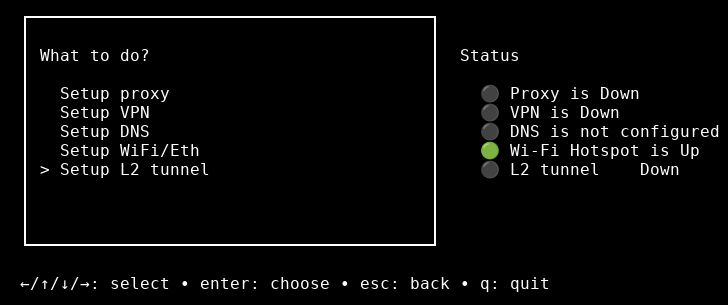
In the main menu, go to the "WiFi/Eth" section.
Select the "Setup WiFi Hotspot" option.
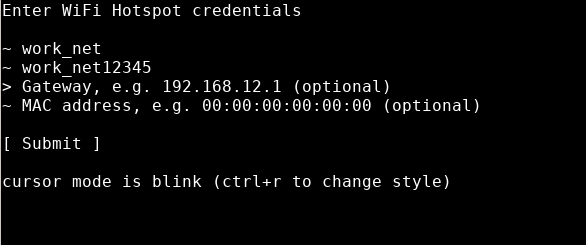
You will be prompted to enter:
- Wi-Fi network name (SSID).
- Wi-Fi password (at least 8 characters).
- (Optional) Network interface, gateway, MAC address. If not specified, the program will select them automatically.
Additionally, ZloyRouter allows you to manage the local network during distribution (Wi-Fi Hotspot / Sharing) by configuring:
- Gateway — the starting point of the local network and, consequently, the subnet in which client devices will be located.
- and DHCP will automatically assign addresses to connected devices within the selected network.
Below, as an example, is a network configuration variant where the 192.168.2.* subnet is overridden and hardcoded.

This setting is not mandatory, but you can use it if necessary.
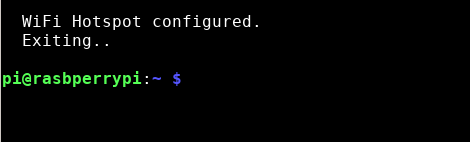
Save the settings by clicking Submit / Save
Result: you get a manageable LAN environment that can be standardized for a specific task and scaled across multiple devices/testbeds.
Once the Wi-Fi hotspot is successfully launched, you can connect to this Wi-Fi network from other devices (phone, laptop, etc.) using the network name and password you specified.
L2 Tunnel Configuration
A feature required to access blocked resources. If there are no blocks or restrictions in your country of residence, using an L2 tunnel is not necessary.
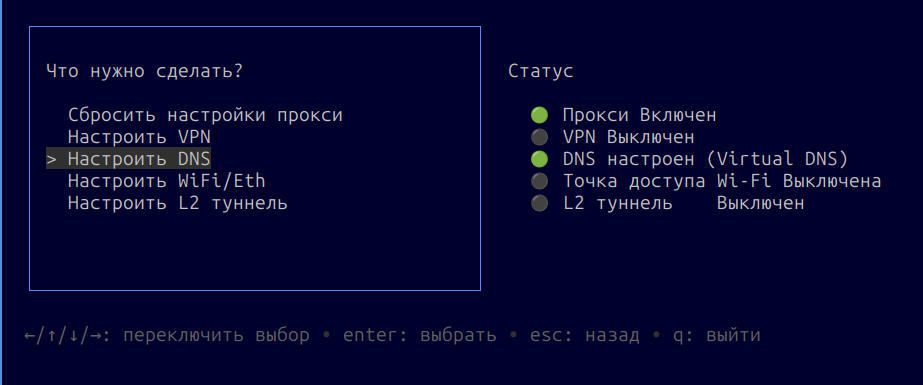
In the program's main menu, select "L2 Tunnel".
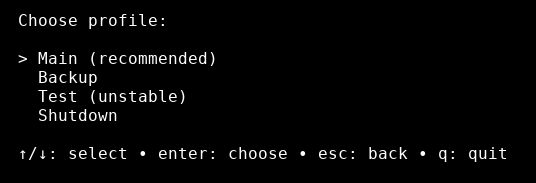
Next, select one of the available profiles to launch the tunnel.
If you need to stop a previously launched tunnel, select the corresponding option ("Stop L2 tunnel").
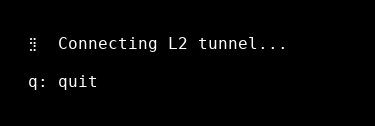
The L2 tunnel launch will begin:
For the L2 tunnel to work, your VPN/Proxy or any other bypass methods must be turned off.
Proxy Configuration
The main advantage of configuring a proxy on the ZloyRouter gateway side compared to using a proxy in a browser is that your devices and their browsers will not know they are behind a proxy. For them, the connection is native at the hardware level.
%% Note: If you are working with applications that rely on "correct resolving" (when, in response to a certain name, the application must return the IP addresses configured in the specific DNS for that site), and also if the application relies on ping (ping only goes as far as your Raspberry Pi) - it is recommended to use not VDNS, but by priority: DoH and then UDP. Read about the configuration below. %%
Thanks to the proprietary WunderDNS technology, ZloyRouter provides:
✅ Smart DNS adjustment: If, when attempting to get DNS from a US proxy, it returns a DNS of a conditional "Uruguay" on native requests or does not support UDP, WunderDNS will automatically route DNS requests through ultra-fast encrypted channels (DoH/DoT) or through the L2 tunnel (if currently active).
✅ ECS Spoofing: Even when sending a request through fast public servers, WunderDNS forcibly "embeds" your proxy's IP into it. Anti-fraud systems will see that the request came from a resident of the proxy's country (e.g., the US), not from your actual location.
✅ Aggressive caching: Resolving speed increases exponentially. You get the speed of a direct ISP. Ping no longer reveals the presence of a "tunnel"!
Let's start the configuration:
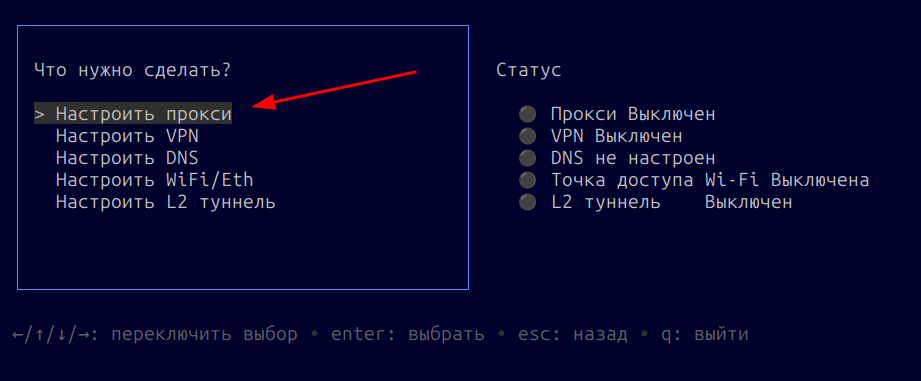
In the main menu, select "Configure proxy".
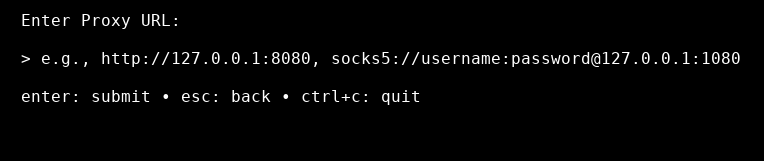
You will be prompted to enter the URL of your SOCKS proxy, for example: socks5://username:password@127.0.0.1:1080
At the same time, ZloyRouter features smart proxy recognition (Smart Paste), meaning you can paste your proxy into the Router in any convenient format:
socks5://ip:port:user:pass
socks4://user:pass@ip:port
https://ip:port|user:pass
etc.
The Router will automatically figure out where the login and password are!
Enter the proxy address and press Enter.
In the next step, you will be prompted to automatically select and install native DNS for your proxy (WunderDNS technology).
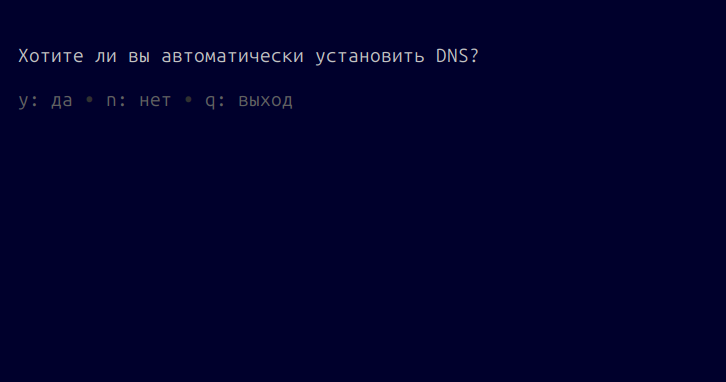
If you select y, magic will happen, and our WunderDNS technology will conduct a parallel stress test of this proxy in a fraction of a second, as well as check its support for Socks5h (If your proxy can work with Socks5h, its DNS will be used; if not, the availability of DNS servers via UDP is checked).
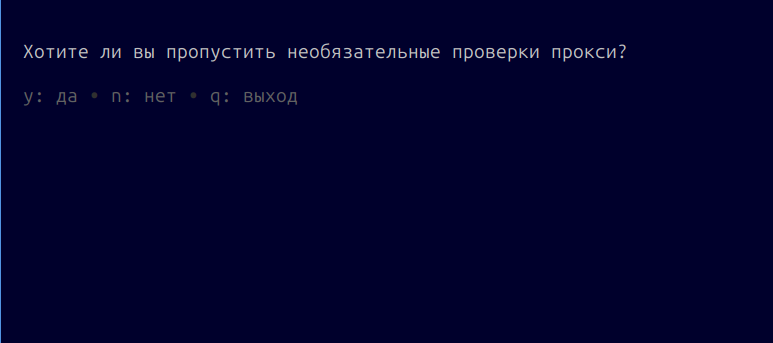
If you're not running late for a flight, it's better to press n and run all the tests.
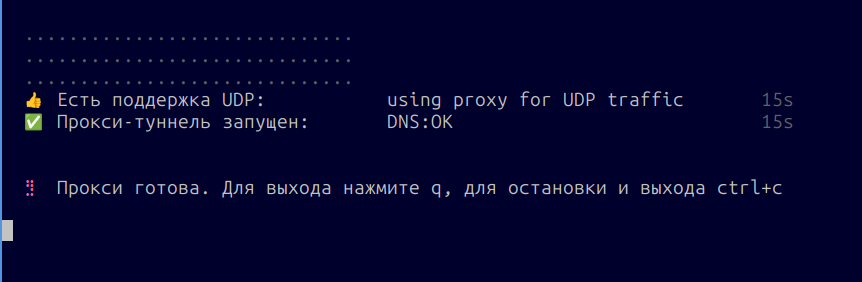
Done! The system has run over a dozen proxy quality tests in the background (including checking for Socks5h and UDP support, and selecting native DNS) and established a connection.
Below is shown how to test the connection speed with and without WunderDNS enabled, i.e., the automatic selection of native DNS.
How to correctly test speed
- Open the desired website (e.g., Amazon) with WunderDNS turned off (i.e., without automatic DNS selection).
- Press F12 (Developer Tools) -> Network tab.
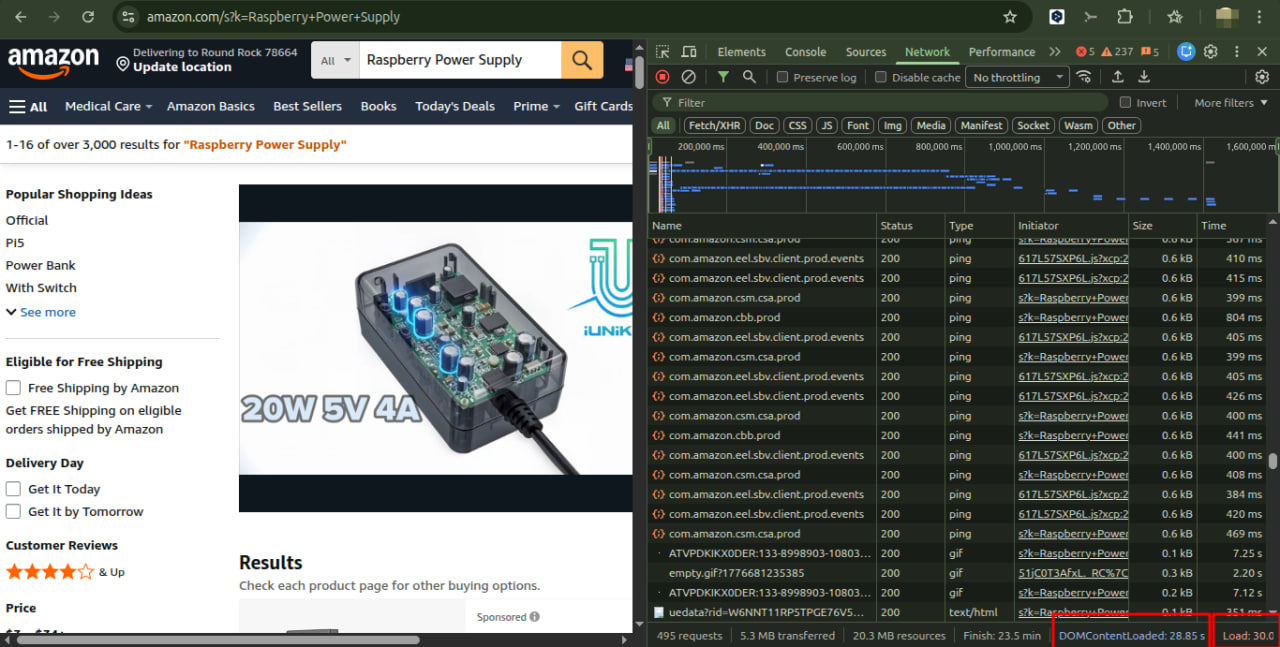
- Look at the DOMContentLoaded metric (document parsing time) at the very bottom of the panel.
- Enable WunderDNS, and reconnect.
- CRITICALLY IMPORTANT: Before the second test, make sure to clear the browser cache and OS DNS (reconnect to the router's Wi-Fi or use Incognito mode / completely new domains). Otherwise, the browser will use the old cached DNS, and the test will be biased!
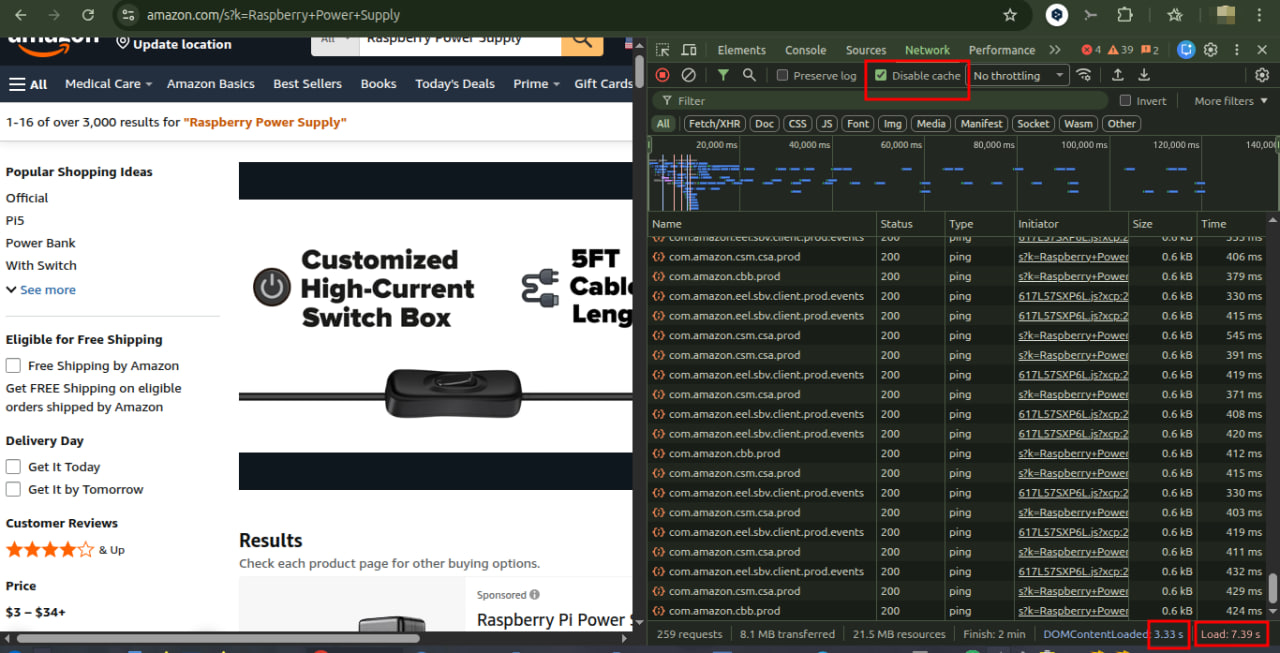
- Measure DOMContentLoaded again.
WunderDNS Configuration
If WunderDNS successfully selected the DNS automatically during proxy configuration, additional manual DNS setup is no longer required. In case you need fine manual tuning, you can use the extensive DNS configuration functionality.
Go to Configure new configuration
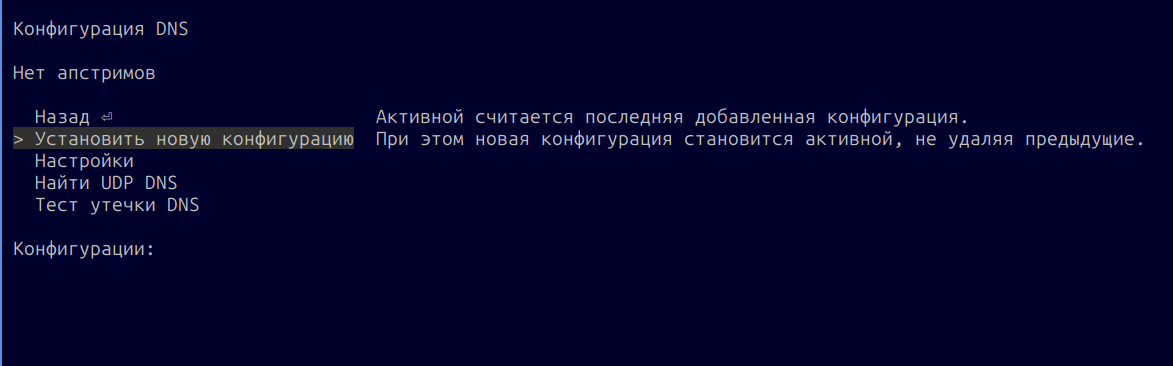
You will be prompted to select a DNS type.
More details on DNS types:
DNS Type (UDP / DoH / DoT) — is the upstream protocol (how exactly WunderDNS connects to the DNS server).
Binding — is the connection type/routing, meaning through what exactly this upstream will be "exposed" to the network.
1) UDP + Socks5 UDP
Classic DNS over UDP via SOCKS5
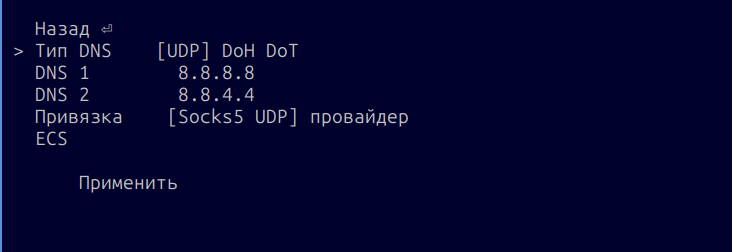
What it is: standard UDP DNS requests over port 53 to DNS 1 and DNS 2, but sent through a SOCKS5 proxy with UDP relay support. If the Socks5 Proxy does not support UDP, then "Socks5 UDP" will not be displayed in the Binding line, and only the ISP and L2 tunnel will be shown, if active.
How it works:
- WunderDNS generates UDP DNS requests to 8.8.8.8:53, 8.8.4.4:53 (or your DNS1/2).
If you have your own ISP and you know it has its own DNS server, you can enter it (a conditional Rostelecom or Comcast (especially if your proxy is in the Comcast network) - this will be as native as possible. The advantage of UDP is the ability to manage the cache. This is particularly relevant and noticeable if you plan to work with a proxy for 15 minutes or more.
- Transport to these addresses is built via SOCKS5 UDP ASSOCIATE (if the proxy supports it).
When to use:
- When the proxy lacks Socks5h support, and you want to use the ISP's DNS server from the proxy network (e.g., Comcast). You know you are connecting to a conditional Comcast and you know exactly what its DNS is.
To check, you can find the Comcast DNS and make a request to it via
dig 75.75.75.75(most likely it will be unavailable), then connect through the proxy and try again - it should become available.
- The proxy is of high quality and stably maintains UDP.
- You want to guarantee that DNS goes inside the proxy, not through the ISP.
Limitations/Risks:
- Many SOCKS5 proxies from providers do not support UDP or throttle it.
- It can be slow/unstable on "overloaded" proxies.
- If the proxy responds "strangely", symptoms of DNS spoofing/substitution are possible (but WunderDNS checks this during proxy tests).
2) UDP + ISP UDP
Classic DNS over UDP directly through the ISP
Warning: the binding option through your Internet Service Provider (ISP) is only for advanced users and provided you understand how it works and why you need it.

What it is: standard UDP DNS requests to port 53 are sent to the DNS1 server and (if needed) DNS2, but the route is directly through the ISP, bypassing the proxy.
How it works:
- WunderDNS sends UDP/53 to the specified DNS servers through the regular network routing of your Internet Service Provider (ISP).
- The proxy is not involved.
When to use:
- The proxy is poor/overloaded, and DNS "through the proxy" lags or drops.
- The main priority is speed.
- You are not afraid of ECS leaks and ISP filtering. You have ECS spoofing enabled, and you consciously compensate for geo/anti-fraud risks.
Limitations/Risks:
- The main risk is DNS leaks along the route (it's visible that your ISP is providing DNS).
- If ECS is not used/not suitable for the selected resolver, a real region leak is possible (DNS geo might differ from the proxy/VPN IP).
- In some networks, UDP/53 may be restricted/intercepted.
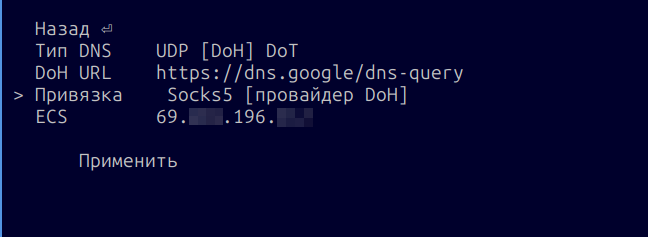
3) DoH + Socks5 DoH
DNS over HTTPS via SOCKS5
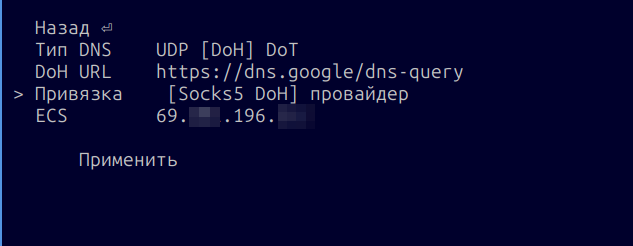
What it is: DNS requests are sent as HTTPS (DoH URL), and the connection to the DoH endpoint is established via SOCKS5.
How it works:
- WunderDNS opens an HTTPS connection (usually HTTP/2) to https://dns.google/dns-query (or another URL).
- The connection (TCP) is made via SOCKS5; if socks5h logic is used, the DoH endpoint name is resolved on the proxy side.
When to use:
- UDP through the proxy is unstable/blocked, but TCP/HTTPS works.
- You need to "mask" DNS as regular HTTPS traffic (often passes better).
- You want DNS to go inside the proxy (and not through the ISP).
Limitations/Risks:
- A live TCP through the proxy and DoH endpoint availability are required.
- Sometimes HTTP/2 or specific DoH domains are blocked.
- If the proxy "only understands HTTP" (not SOCKS5), this binding may be unavailable.
4) DoH + ISP DoH
DNS over HTTPS directly through the ISP (your Internet Service Provider)
Warning: the binding option through the ISP is only for advanced users and provided you understand how it works and why you need it.
What it is: DoH (HTTPS) to the selected DoH URL, but bypassing the proxy — through the ISP.
How it works:
- The HTTPS connection to the DoH endpoint is established directly via the regular network.
- DNS is sent as HTTPS.
When to use:
- You need speed/stability, and the proxy can't handle DNS.
- UDP/53 is blocked, but HTTPS passes.
- You want to reduce the "visibility" of DNS (HTTPS instead of UDP), even if the traffic goes through the ISP.
Limitations/Risks:
- This is still a DNS route leak (the provider sees the connection to the DoH endpoint).
- Geo/anti-fraud mismatches are possible without ECS or with incorrect ECS.
- Some networks block DoH endpoints.
5) DoT + Socks5 DoT
DNS over TLS via SOCKS5
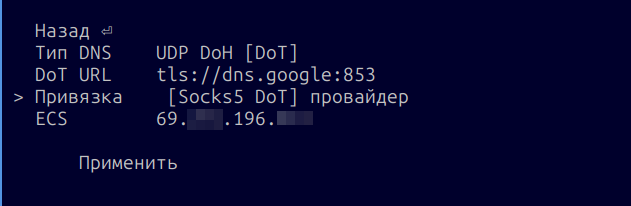
What it is: DoT (DNS over TLS) to the selected DoT URL (tls://host:853) via SOCKS5.
How it works:
- WunderDNS establishes a TCP connection to dns.google:853 (or your DoT URL) via SOCKS5.
- Next goes TLS, inside of which is DNS.
When to use:
- UDP through the proxy doesn't work, but TCP does.
- DoH is undesirable for some reason (policies/blocks/preferences), but DoT is available.
- You need to keep DNS inside the proxy.
Limitations/Risks:
- DoT typically uses port 853, and it is often blocked or throttled in networks where HTTPS/443 remains accessible.
- On some proxies/networks, DoT has lower "passability" than DoH.
- Requires a stable TCP through the proxy.
6) DoT + ISP DoT
DNS over TLS directly through the ISP
What it is: DoT (DNS over TLS) to the selected DoT URL () tls://...:853) directly through the provider, without a proxy.
How it works:
- TCP+TLS to the DoT server is built through the ISP.
- DNS inside TLS.
When to use:
- The proxy is unstable, but DoT is directly available.
- You want encrypted DNS, but without binding to specific DoH endpoints/HTTPS.
Limitations/Risks:
- Blocks on 853 are possible.
- DNS traffic bypasses the proxy → DNS leaks / geo-mismatches are possible (without ECS / with incorrect ECS).
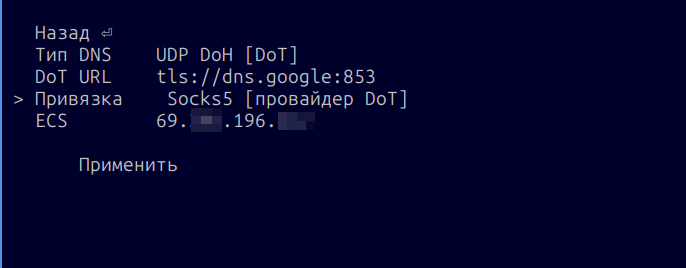
About ECS
In the settings and screenshots, you see another field ECS 69.{xxx}.196.{xxx}
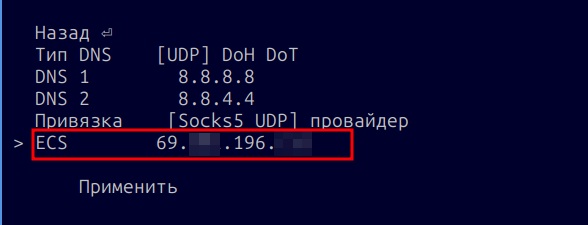
This is EDNS Client Subnet — a DNS extension that a resolver can use to account for the "client's subnet" for geo-responses (CDN/anti-fraud).
Why it is in WunderDNS:
- If DNS does not go through the proxy (ISP binding), ECS allows you to "slip in" the proxy's IP/subnet so that CDN/geo responses look like they are meant for the proxy, not for your real ISP.
- Even with Socks5 binding, ECS can be used to stabilize "geo" on the resolver side.
When to enable/use:
- When you see that without ECS, responses come "from the wrong region" (wrong CDN nodes) or anti-fraud systems react to the mismatch.
Limitations:
- Not all resolvers use ECS equally (e.g., Cloudflare often doesn't use ECS in a typical scenario; Google does).
- "Always spoof ECS" is not a universal rule: for some resolvers, it is unnecessary and may even worsen predictability.
VPN Configuration
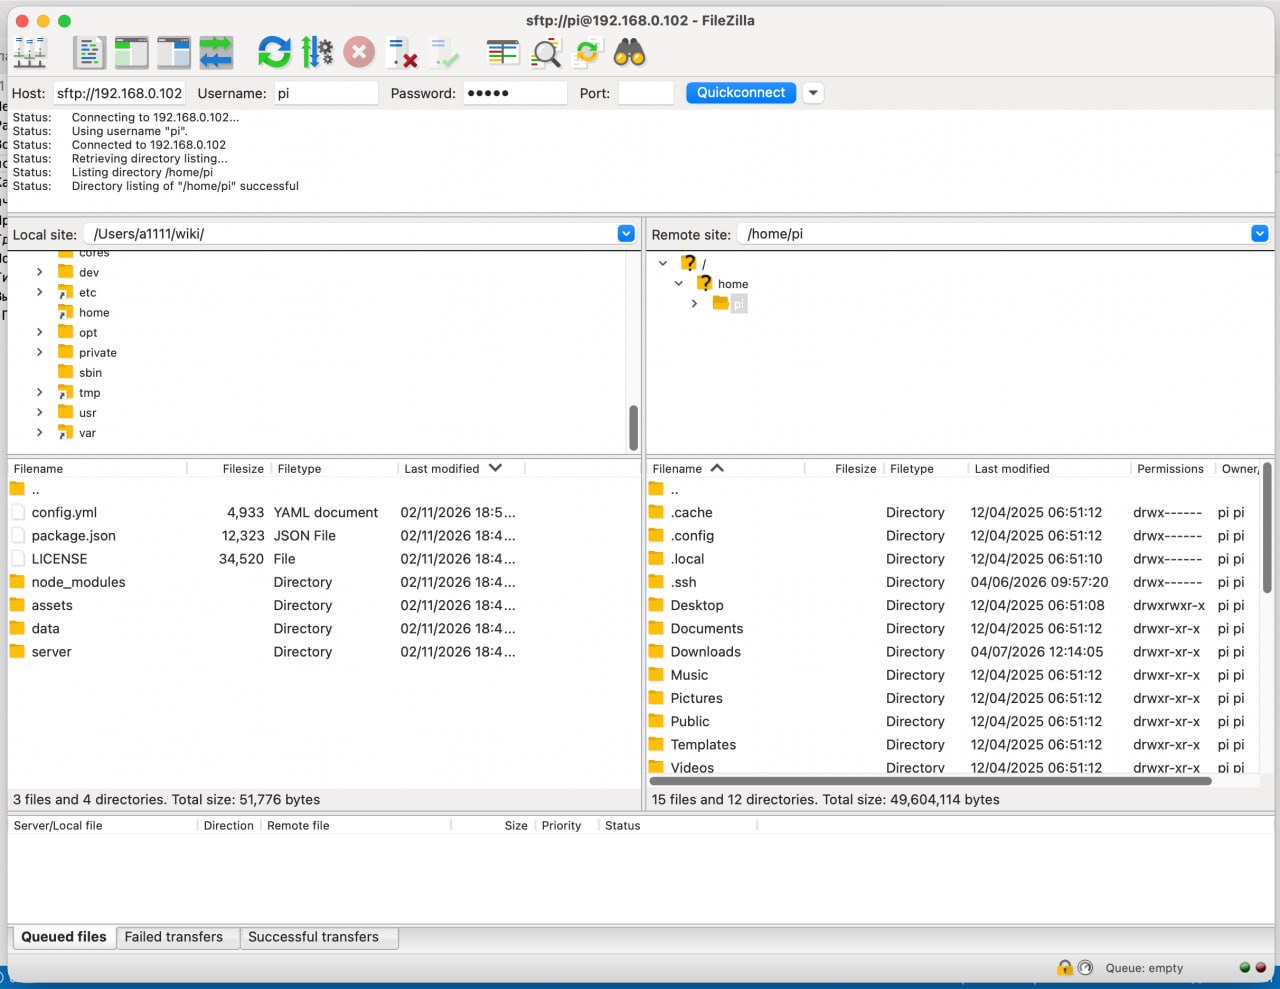
Instructions: How to upload an OVPN file to a Raspberry Pi via FileZilla
This step-by-step guide explains how to copy an OpenVPN configuration file (with the .ovpn extension) from your computer to your Raspberry Pi using FileZilla.
Preparation
Before you start, make sure you have:
- Configured Raspberry Pi: The device must be connected to your local network (via cable or Wi-Fi).
- Connection details for Raspberry Pi: IP address (e.g., 192.168.1.105) or hostname (raspberrypi.local).
- Username (default is pi).
- Password, which you set during the initial OS installation.
- .ovpn file: Your VPN configuration file saved on your computer.
- Computer, located on the same local network as the Raspberry Pi.
Installing FileZilla on your computer
FileZilla is a free FTP client that supports secure connections via SFTP (SSH File Transfer Protocol), making it ideal for working with a Raspberry Pi.
Download the installer: Go to the official website: https://filezilla-project.org/ (Select your OS) or download it from the App Store.
Click on the "Download FileZilla Client" button (NOT Server).
Install the program: Run the downloaded file and follow the installation wizard instructions.
Connecting to Raspberry Pi
Open FileZilla. At the top of the window, you will see the "Quickconnect" bar.
Fill in the connection fields:
Host: Enter the IP address of your Raspberry Pi or its hostname (raspberrypi.local).
Username: Enter your username (default is pi).
Password: Enter your Raspberry Pi password.
Port: Enter 22 (the default SFTP port).
Example: Host: 192.168.1.105 | Username: pi | Password: •••••••• | Port: 22
Click "Quickconnect".
Accept the host key: If you are connecting for the first time, a warning window about an unknown host key will appear. This is normal. Check the "Always trust this host, add this key to the cache" box and click "OK".
Warning!
If you encounter difficulties at this stage, please refer to the official documentation on using FileZilla
Copying the .ovpn file
Upon successful connection, the program window will be split into two parts:
* Left (Local Computer): The file system of your computer.
* Right (Remote Site / Raspberry Pi): The file system of your Raspberry Pi.
- Find your OVPN file: In the left panel, navigate to the folder on your computer where the .ovpn file is located.
- Select the destination on the Raspberry Pi: The right panel will open your user's home directory (e.g., /home/pi). This is a convenient place to store configuration files (the same place where the ZloyRouter binary is located). If you changed the username, the folder will be: /home/Username.
- Drag and drop the file: Click on the .ovpn file in the left panel, hold the mouse button, and drag it to the right panel. Release the mouse button.
- Check the result: At the bottom of the FileZilla window, there is a file transfer log. Make sure your file appeared in the "Successful transfers" tab. You should also see it in the file list in the right panel.
Done! Your .ovpn file has been successfully uploaded to the Raspberry Pi and is ready for further configuration and use in ZloyRouter.
Connecting an OVPN config via ZloyRouter
- Launch ZloyRouter (if it isn't running already):
sudo ./zloyrouter - Go to the VPN section: Select the VPN item from the main menu.
- Select OpenVPN: In the VPN menu, select OVPN.
- Specify the path to the file:
- A file manager will open. Navigate to the folder where you uploaded the OVPN config (e.g., /home/pi).
- Find your .ovpn file and select it by pressing ENTER.
- The path to the selected file will appear in the Selected ... line.
- Start the connection: Press CTRL+C, and ZloyRouter will begin connecting to the VPN using the selected config.
- Wait for the connection: ZloyRouter will display the connection status. The process may take a few seconds.
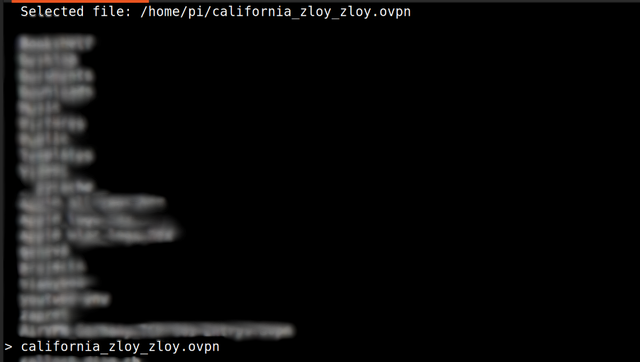
Done! Your Raspberry Pi is now connected to the VPN via OpenVPN.
Viewing the status and exiting the program
ZloyRouter launches and runs as a Linux system service.
When you exit the configurator (key q), ZloyRouter will continue to run.
You can view the service status using the command sudo service zloyrouter status
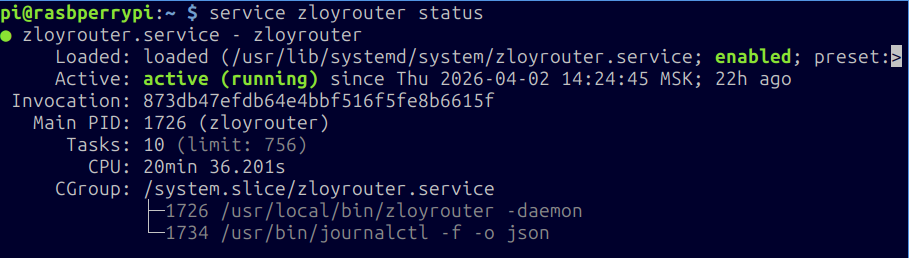
In the event of any issues with the program, most can be resolved by restarting the Raspberry Pi via sudo reboot.
Diagnostics and Troubleshooting
Launch Error: Can't check daemon state [014]
If upon running sudo ./zloyrouter the program immediately crashes with an error like:
Can't check daemon state: [014] Can't check /ping via socket /tmp/zloyrouter/daemon.sock it means the background router process is frozen, or you updated the program without stopping the old version and Wi-Fi hotspot. A version or port conflict has occurred.
Solution (follow the steps in order):
Step 1. Force stop all ZloyRouter processes
Run the following commands in the terminal:
sudo service zloyrouter stop
sudo killall -9 zloyrouter
Step 2. Delete the "stuck" socket file
Sometimes the system cannot delete the temporary communication file itself. Let's delete it manually:
sudo rm -f /tmp/zloyrouter/daemon.sock
Step 3. Ensure you have downloaded the latest version
The error often occurs if the old file was not deleted. Delete the old binary and download the new one strictly according to the Update Instructions.
sudo rm /usr/local/bin/zloyrouter
rm zloyrouter
Next, download the file for your architecture via curl and run chmod +x (see instructions).
Step 4. Full Raspberry reboot (Mandatory!)
Do not launch the router right away. Be sure to clear RAM and reset network interfaces with a reboot:
sudo reboot
Step 5. Launch
After rebooting, log in to the Raspberry Pi and run the program as usual:
sudo ./zloyrouter
⚠️ WARNING! Reinstalling the OS (Raspberry Pi OS) to solve this problem is strictly prohibited! A complete system reinstall or replacing the SD card will change your device's unique ID, and your license will be voided (a
[000] License check errorwill appear). Problem [014] is resolved solely by the commands above and a reboot.
OpenVPN
If you see the following message when loading the OpenVPN configuration:
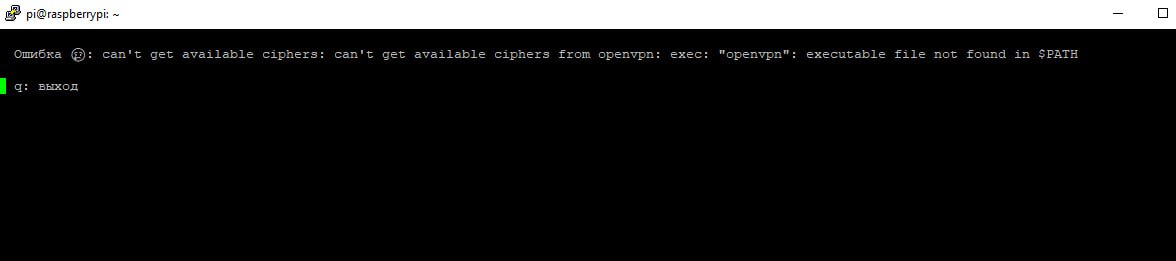
This means OpenVPN is not installed on your system.
Install it:
sudo apt update
sudo apt install openvpn -y
After installing OpenVPN, repeat the configuration loading operation.
L2 Tunnel
If for some reason the primary L2 tunnel fails to start and you see an error message, try launching the Backup profile of the L2 tunnel:
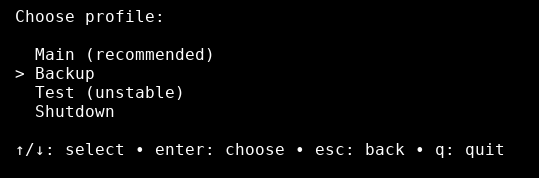
If the backup profile also fails...

Press ctrl+c, exit the program, collect the logs, and send them to us.
For how to quickly and correctly collect software execution logs, refer to the ZloyRouter Diagnostic Log Collection Guide.
Sharing Internet to a phone via cable
Why is this needed? - Smartphones constantly scan surrounding Wi-Fi and Bluetooth networks to pinpoint your real location (even if GPS is turned off). Connecting to ZloyRouter via cable allows you to completely disable the phone's wireless modules (switch the phone to Airplane Mode), routing all traffic through the gateway and ensuring maximum anonymity from geo-tracking.
Operating scheme:
graph LR
    A[🌐 Internet<br>Router or 4G modem] -->|Incoming traffic| B(🍓 Raspberry Pi <br> ZloyRouter)
    B -->|LAN: RJ45 cable| C[🔌 Network adapter<br>Lightning / Type-C]
    C -->|Wired Internet only| D[📱 iPhone / Android<br>strictly in Airplane mode]

    classDef zloy fill:#e74c3c,stroke:#c0392b,stroke-width:2px,color:#fff;
    classDef isolated fill:#f39c12,stroke:#d35400,stroke-width:2px,color:#fff;
    class B zloy;
    class D isolated;
Configuring a wired (Ethernet) connection on iPhone
To use ZloyRouter via cable with an iPhone, you will need to connect the phone through an appropriate Ethernet adapter (see "Ethernet Network Adapters (RJ45) for Phones and Laptops" in the Hardware section).
Step-by-step configuration
- Open Settings → Ethernet (this item will appear automatically when the adapter is connected).
- Go to the Configure IP section and select Automatic (DHCP).
- Alternative option: If DHCP is disabled on your Raspberry Pi, select Manual and specify the IP address, subnet mask, gateway, and DNS (according to your network settings).
Possible problems and their solutions
If the connection did not work (most common situations):
* "Accessory consumes too much power" message
Lightning adapters require additional power. You will need to connect a power cable to the adapter itself (or use a powered USB hub). Read more at Apple Support.
* IP address like 169.254.x.x
This means the Raspberry Pi did not issue a DHCP address. In this case, there is nothing left to configure on the iPhone itself — you need to check the network and DHCP server settings on the Raspberry Pi side.
Configuring a wired (Ethernet) connection on Android
To work via cable, you will need a USB Type-C to Ethernet adapter (or Micro-USB OTG with an Ethernet adapter for older devices). It is advisable to choose adapters with an additional Type-C port for parallel smartphone charging (Power Delivery), so the phone does not discharge during operation.
Step-by-step configuration
- Put the phone in Airplane Mode and ensure that Wi-Fi and Bluetooth are fully turned off in the settings (to prevent geolocation leaks).
- Connect the adapter with the cable from ZloyRouter to the smartphone.
- Open Settings → Network & internet (or Connections on Samsung) → Ethernet. (This menu item usually appears only after physically connecting the adapter).
- By default, the system will automatically receive settings from the router (DHCP).
- Alternative option: If DHCP on the Raspberry is disabled, tap the adapter name in the Ethernet menu, select Static IP, and manually enter the IP address, mask, gateway, and DNS.
Possible problems and their solutions
- The "Ethernet" item does not appear in settings
Unlike iOS, Ethernet support on Android depends on the specific smartphone manufacturer and firmware. Some brands (e.g., budget Xiaomi/Redmi models) may remove Ethernet drivers from the system kernel. If the menu does not appear, your smartphone does not support a wired connection at the hardware or software level. - The smartphone discharges quickly / The network disconnects
The network adapter is powered by the smartphone's battery. If the adapter consumes too much power, the system may turn it off to save energy. Use a Type-C hub with the ability to connect a charger (PD Passthrough). - An IP address is not issued (Network without internet access)
Ensure that the DHCP server is running correctly on the Raspberry Pi, or set a static IP address manually.
Tested adapter chips for Android:
As a rule, adapters based on Realtek (RTL8153 / RTL8152) and ASIX (AX88179) chips work perfectly on Android. Most adapters from Ugreen, Baseus, and TP-Link are Plug-and-Play.